Summary: Canon Cinema EOS C500 records footage in MXF file format, if you want to open these .mxf clips in iMovie on your Mac OS X computer, you’ll need to convert Canon EOS C500 MXF footage to AIC, iMovie’s native format.
The Cinema EOS C500 4K Digital Cinema Camera is Canon’s second camera in its Cinema EOS line, following the previous Canon EOS C300. Compared to the 2K and HD capture of the C300, the C500 has new added 4K and QHD motion video capture, and has the ability to record raw motion video to the Motion RAW format.
Canon Cinema EOS C500 records footage in MXF file format, if you want to open these .mxf clips in iMovie on your Mac OS X computer, you’ll need to convert Canon EOS C500 MXF footage to AIC, iMovie’s native format using 3rd party applications like Video Converter for Mac.
The HD Video Converter for Mac is good at converting camera footage from one format to another, so that users can easily rewrap their camera footage to an intermediate codec for using in post-production workflows. For instance, it supports converting MXF footage shot with Canon C300, C500, XF100, XF105, XF300, XF305, Panasonic P2, Sony XDCAM, and Sony XVAC to AIC for iMovie, to Apple ProRes for FCP, to DNxHD for Avid, and more. More than MXF files, it also handles HD recordings in format of AVCHD/MTS, H.264 MOV, GXF, XAVC S MP4, AVI, TiVo and so on.
Download a free trial of Canon C500 MXF Converter

How to transcode Canon EOS C500 MXF footage to AIC for iMovie?
Follow these steps:
Step 1: Run HD Video Converter for Mac as a Canon C500 MXF to iMovie Converter. From the main interface, click ‘Add File’ button to import MXF shootings captured by a Canon C500 4K Digital Cinema Camera. You can load directly from a camera or from a card reader, or from a folder on your HDD that contains your media data.

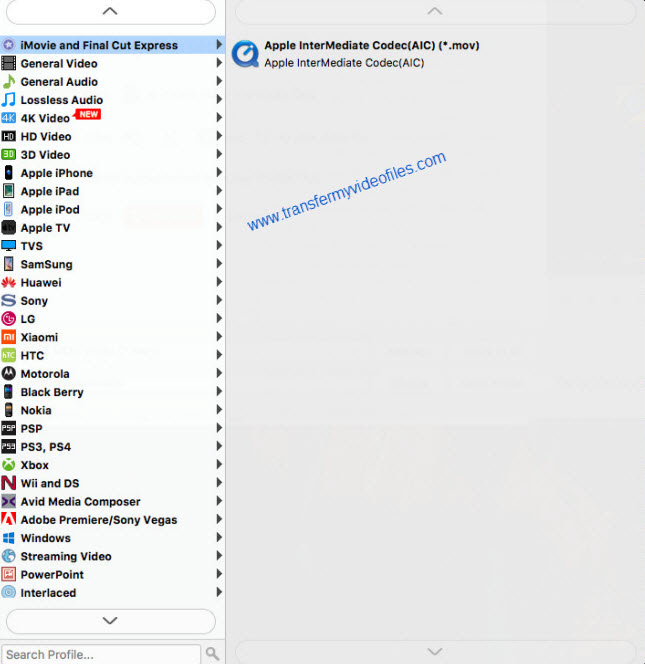
Step 2: Select output format for iMovie
In order to edit Canon C500 MXF shootings in iMovie, from the Format bar, choose ‘Apple InterMediateCodec (AIC) (*.mov) as output format from ‘iMovie and Final Cut Express’ catalogue.
Important: If you’ve loaded a number of video clips to do batch conversion, please do remember ticking off ‘Apply to All’ option before you start.
Step 3: Custom video and audio settings (optional)
If you want to adjust video and audio settings in your own way, you can click ‘Setting’ button and go to ‘Profile Settings’ panel to do so, if not, simply skip this step.
Step 4: When ready, click the ‘Convert’ button to start converting Canon footage to AIC for using within iMovie 8’ 9 or the later version iMovie’11.
Tips: You can tick off ‘Showdown computer when conversion completed’ checkbox, and go away to do other things instead of waiting around in front of the computer for the entire conversion process.
Step 5: When the conversion finished, click ‘Open Folder’ button to find the generated AIC .MOV files for using in iMovie. The AIC file can be used in Final Cut as well.
Also read
How to edit and import Olympus E-PL3 AVCHD video to iMovie?
60fps video in iMovie – does iMovie’11 properly handle 60fps video now?
How to edit AVCHD files taken with Canon LEGRIA camcorder on Mac?