A number of users have reported DaVinci Resolve no audio issues on import. Is there a way to solve the problem? Read this post to learn a workaround to solve audio lost issues while loading a video file into DaVinci Resolve.
DaVinci Resolve cannot import audio in .mts files
“Hi there, I have a Sony FS700 camera. I’m having issues working with its .mts files in DaVinci Resolve. Resolve can import FS700 .mts files but it can’t import the audio associated with those .mts files. Anyone else have the same issue? How can I go through it? Can anybody help me? Thanks.”
The simple solution is converting your video files to a format that is best suitable for use in Resolve, such as DNxHD and ProRes. This requires third party converter software like HD Video Converter. Check a quick guide on how to create DaVinci Resolve edit friendly files.
How to create DaVinci Resolve edit friendly files?
Software requirement
HD Video Converter


The steps:
Step 1: Start up HD Video Converter as a Video Converter for DaVinci Resolve. When its main interface pops up, click ‘Add File’ to input your source media.

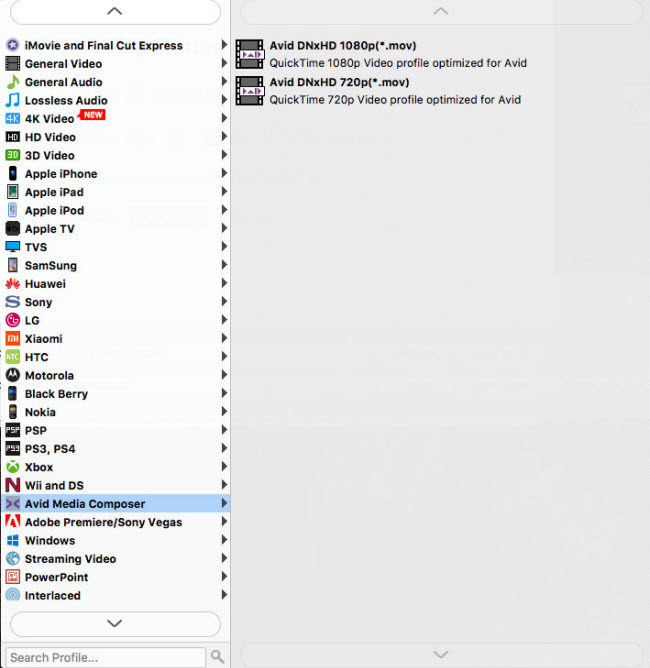
Step 2: Choose output format for DaVinci Resolve
To convert video files to DNxHD for DaVinci Resolve, you can from ‘Profile’ bar, select ‘Avid DNxHD (*.mov)’ as output format under ‘Avid Media Composer’ column.
To encode video files to ProRes 422 for DaVinci Resolve, you can choose ‘Final Cut Pro’ > ‘Apple ProRes 422 (*.mov)’ as target format.

Important: If you’ve loaded a number of video clips to do batch conversion, please do remember ticking off ‘Apply to All’ option before you start.
Step 3: Custom video and audio settings
If necessary, you can click ‘Settings’ button and go to ‘Profiles Settings’ panel to modify video and audio settings like video encoder, resolution, video bit rate, frame rate, aspect ratio, audio encoder, sample rate, audio bit rate, and audio channels. 3D settings are also available.
Step 4: Start video files to DNxHD/ProRes MOV Conversion
When ready, click ‘Convert’ to start format conversion. As soon as the conversion is complete, you can click ‘Open Folder’ button to get the exported MOV files for use in DaVinci Resolve with optimum performance. You won’t encounter audio lost issues any more.
Related posts
Sony PXW-Z100 4K XAVC video to FCP and DaVinci Resolve
DaVinci Resolve workflow with Panasonic AG-HPX250 P2 MXF
How to import and edit AVCHD footage within DaVinci Resolve?
DaVinci Resolve workflow with Sony F55/F5 XAVC MXF footage
How to import Sony HDR-AS15 MP4 footage to DaVinci Resolve?