This post gives a clue for people who are looking for a fast and fluid way to import Canon EOS C300 Mark II 4K XF-AVC MXF movies to DaVinci Resolve for further editing. It guides you through the process of converting C300 MK II 4K XF-AVC MXF files to ProRes/DNxHD codec for use in DaVinci Resolve with optimum performance.
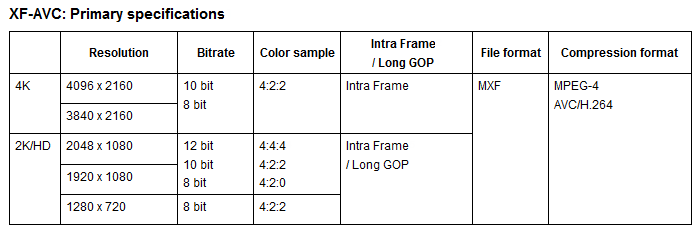
Together with the two new cameras Canon EOS C300 Mark II and XC10, Canon has introduced a new video format for the 4K, 2K and HD Recording, XF-AVC. It uses compression MPEG-4 AVC / H.264 and stores the files in MXF container format. The following table lists the exact information.
Canon has officially announced that XF-AVC is compatible with Grass Valley, but on some occasions, users still need to transcode C300 MK II 4K XF-AVC MXF files for a faster and more fluid workflow. This requires third party converter software like HD Video Converter. Here’s a quick guide on how to transcode C300 MK II 4K XF-AVC MXF files to ProRes/DNxHD for DaVinci Resolve.
Software requirement
HD Video Converter


[Guide] How to encode C300 Mark II 4K XF-AVC MXF movies for DaVinci Resolve editing?
Download and install HD Video Converter, then follow these steps:
Step 1: Run HD Video Converter as a professional Canon XF-AVC to DaVinci Resolve Converter. When its main interface comes up, click ‘Add File’ to load source video to it.

Step 2: Select output format for DaVinci Resolve
1) Convert C300 Mark II XF-AVC to ProRes for Resolve
From ‘Profile’ list, move to ‘Final Cut Pro’ catalogue, and select ‘Apple ProRes 422 (*.mov)’ as target format.

Note that the ProRes output is only valid in the Mac version of HD Video Converter.
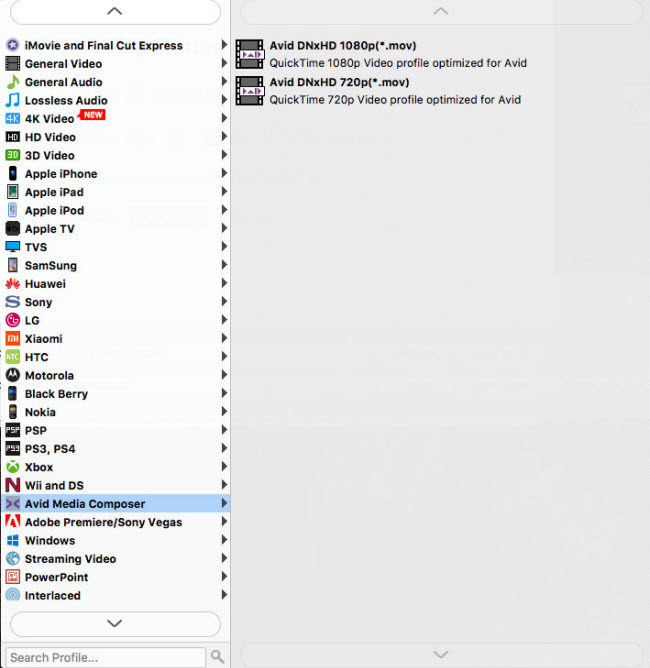
2) Transcode Canon C300 Mark II XF-AVC to DNxHD for DaVinci Resolve
From ‘Profile’ list, select ‘Avid DNxHD (*.mov)’ as output format under ‘Avid Media Composer’ column.
Important: If you’ve loaded a number of video clips to do batch conversion, please do remember ticking off ‘Apply to All’ option before you start.
Step 3: Adjust video and audio settings (for advanced users)
If necessary, you can click ‘Settings’ button and go to ‘Profiles Settings’ panel to modify video and audio settings like video encoder, resolution, video bit rate, frame rate, aspect ratio, audio encoder, sample rate, audio bit rate, and audio channels. 3D settings are also available.
Step 4: Click ‘Convert’ to start Canon C300 Mark II XF-AVC files to ProRes/DNxHD conversion.
Step 5: Click ‘Open Folder’ to get generated ProRes/DNxHD QuickTime files for use in DaVinci Resolve with optimum performance.
Related posts
Trouble working with MXF files in DaVinci Resolve
Sony PXW-Z100 4K XAVC to FCP and DaVinci Resolve
How to import and edit AVCHD footage within DaVinci Resolve?
DaVinci Resolve workflow with Sony F55/F5 XAVC MXF footage