Still have issues working with Panasonic Varicam 35 AVC-Intra 4k in FCP X? If you are looking for a fluid way to edit Varicam 35 AVC-Intra 4k media in FCP X, you may wish to read this thread. It presents a workaround to transcode Varicam 35 AVC-Intra 4k files to ProRes 422 for use in FCP X with optimum performance.
Apple has recently released Final Cut Pro X 10.2.2. One big improvement is support for Panasonic AVC-Intra 4:4:4 up to 4K resolution for the VariCam 35. It’s important to keep in mind that AVC-Intra 4K 4:4:4 is a very high quality mastering/mezzanine codec, similar to ProRes 4444, and uses very high data rates (e.g., 700+ Mbps for 24p in 4K). Due to the much higher data rate, users are advised to use an 8-core (or more) Mac Pro (cylinder design) to play back 4K 4:4:4 in real-time.
If for whatever reason you don’t want to update to the most recent version FCP X 10.2.2, or you have a machine that is not powerful enough to handle AVC-Intra 4k footage, you will still need to transcode them to an intermediate codec that is best suitable for use in FCP X, such as ProRes 422, FCP X’s favorite editing format, which FCP X will recognize and handle well. Read on to learn a quick guide on how to convert Varicam 35 AVC-Intra 4k media for FCP X editing.
Here’s what you need
HD Video Converter for Mac

[Guide] How can I transcode Varicam 35 AVC-Intra 4k movies to ProRes 422 for FCP X editing?
Download, install and run HD Video Converter for Mac, then follow these steps:
Step 1: Run HD Video Converter for Mac as a professional Varicam 35 AVC-Intra 4k to ProRes 422 Converter. When its main interface comes up, click ‘Add File’ to load source video to it.
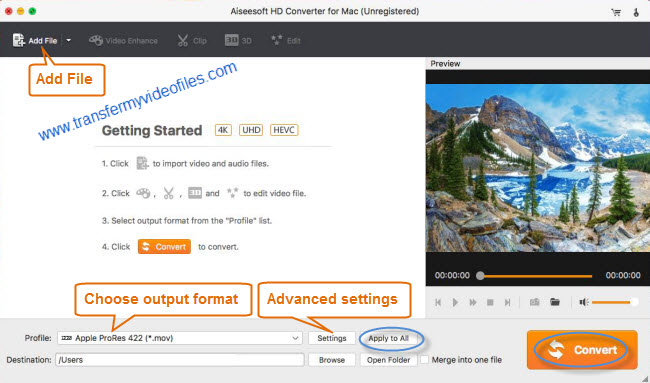
Step 2: Select ‘Apple ProRes 422 (*.mov)’ as output format for opening with FCP X
From the ‘Profile’ list, move to ‘Final Cut Pro’ catalogue, and select ‘Apple ProRes 422 (*.mov)’ as target format. Apple ProRes is the best suited editing codec for FCP X. When loading them into Final Cut Pro X, you needn’t wait for a long time for rendering. To produce smaller files, you can select ‘Apple ProRes 422 (LT) (*.mov) as target format.

Important: If you’ve loaded a number of video clips to do batch conversion, please do remember ticking off ‘Apply to All’ option before you start.
Step 3: Adjust video and audio settings (for advanced users)
If necessary, you can click ‘Settings’ button and go to ‘Profiles Settings’ panel to modify video and audio settings like video encoder, resolution, video bit rate, frame rate, aspect ratio, audio encoder, sample rate, audio bit rate, and audio channels. 3D settings are also available.
Step 4: Click ‘Convert’ to start Varicam 35 AVC-Intra 4k video files to ProRes conversion.
Step 5: Click ‘Open Folder’ to get generated ProRes 422 QuickTime files for transferring and editing in Final Cut Pro X with optimum performance.
To import the transcoded files into Final Cut Pro X. navigate to File > Import > Media. In the window that comes up select your transcoded ProRes clips. DO NOT check “Create Optimized Media” OR “Create Proxy Media”. Both of these check boxes are unnecessary because we already converted the media to ProRes which means Final Cut Pro X can use the footage without “optimizing” it. Checking this box would create a redundant and time consuming second transcode of your footage.
You’re now ready to edit!
Related posts
Why Adobe Premiere Pro CS6 can’t import MXF video files?
How can I import MXF footage into Avid Media Composer?
FCP 7 not recognizing my MXF file – convert MXF to ProRes
Convert P2 MXF to ProRes for FCP 6/7/X without losing sound
MXF and Vegas – How can I edit MXF video files in Sony Vegas?