Having issues working with 4K M2TS video files in Sony Vegas Pro? Read this post to learn a quick guide on how to transcode 4K M2TS content to Sony Vegas Pro preferred file format for further editing.

Issues importing 4K M2TS video files to Sony Vegas Pro
“Hi, all, I’m having issues loading 4K M2TS video files into Sony Vegas Pro. Vegas Pro will not see or play m2ts in 4K resolution. Do I have to change my computer from Intel i5 duo core 4GB RAM (was an ultra light laptop) to a much powerful computer like Intel i7 quad core with 16GB RAM? Or do I need to translate somehow using a third party video converter app? Any help, opinions appreciated…Thanks in advance.”
If for some reason you are unable to use 4K M2TS video files in Sony Vegas Pro smoothly, we would recommend transcoding them to a format that is best suitable for your editing program first. It is true that this method does take a little longer, since it requires converting the 4k .m2ts to another format. However, this method will help speed the editing process a bit. This will be especially helpful if you are stuck using an older desktop or laptop with weak processor and a small amount of RAM. Check a quick guide on how to encode 4K M2TS media for use in Sony Vegas Pro.
Sony Vegas workflow with 4K M2TS footage – how to convert 4K M2TS files for editing in Sony Vegas Pro?
Software requirement
HD Video Converter

To do this:
Step 1: Start up HD Video Converter as a professional 4K M2TS to Sony Vegas Converter. Click ‘Add File’ to import your source media to the program.
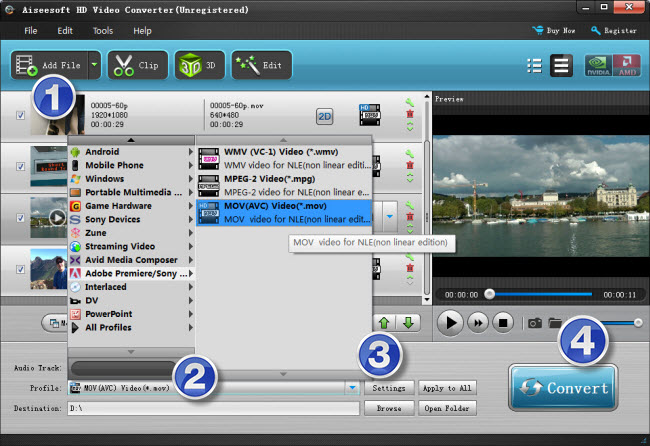
Step 2: Select output format
Click the drop-down list besides ‘Profile’, choose ‘Adobe Premiere/Sony Vegas > MOV (AVC) (*.mov)’ as the most compatible format for Vegas with best quality. You can choose ‘MPEG-2 (*.mpg)’, or ‘WMV (VC-1) (*.wmv)’ as well.
This method is also available when you want to edit 4K M2TS files in Adobe Premiere Pro and After Effects.
Important: If you’ve loaded a number of video clips to do batch conversion, please do remember ticking off ‘Apply to All’ option before you start.
Step 3: Custom video and audio settings (for advanced users)
If necessary, you can click ‘Settings’ button and go to ‘Profiles Settings’ panel to modify video and audio settings like video encoder, resolution, video bit rate, frame rate, aspect ratio, audio encoder, sample rate, audio bit rate, and audio channels. 3D settings are also available.
Step 4: When ready, click ‘Convert’ to start transcoding 4K M2TS files to Sony Vegas supported MOV/WMV/MPG format. As soon as the conversion is complete, click ‘Open File’ button to locate the generated files and now you are able to open them in Vegas Pro easily for further editing.
Related posts
Convert MOV files to MPEG-2 for use in Sony Movie Studio
MXF and Sony Vegas – how can I import MXF files to Vegas?
Working with Insignia AVI in Avid, Premiere and Sony Vegas
AVCHD MTS import issue in Sony Vegas – convert MTS for Vegas