Summary: If you are trying to figure out a way to import .mxf files generated by Panasonic AG-HPX170 to Final Cut Pro for further editing, you may wish to read this post. It explains a solution to convert AG-HPX170 MXF footage to ProRes for using in FCP 6/7/X with optimum performance.

“I attempetd to import MXF footage produced by my Panasonic AG-HPX170 to FCP 7 via Log & Transfer.
Unfortunately, there is no-go, I can not seem to get FCP 7 to recognize those AG-HPX170 .mxf files.
The footage is about a ceremony I filmed for a family friend. I needed to edit them in FCP and then burn to a DVD for delivering to my friend. Can anyone kindly help me out of this conundrum? Thanks a lot.”
If you are shooting with a Panasonic P2 camcorder like AG-HPX170, AG-HPX171, AJ-HPX2100, AJ-HPX2700, AJ-HPX3000, and AJ-HPX3700, AG-HPX300, AG-HPX370/371, and AG-HPX500, you may probably in the same situation as mentioned above. To make FCP work with .mxf files generated by AG-HPX170, the best workaround we have found so far is transcoding AG-HPX170 MXF to ProRes 422 using third party converter like Video Converter for Mac. If not, FCP (X) may refuse reading AG-HPX170 MXF files or spending much time on the rendering process.
Download a free trial of Video Converter for Mac

Read before try
While importing MXF clips to Video Converter for Mac for conversion, please make sure you have the entire MXF file structure as it saved on your camcorder’s P2 card. If you only have some loose .MXF clips, your files will have image only without audio. See MXF file structure on Panasonic’s P2 card as below.
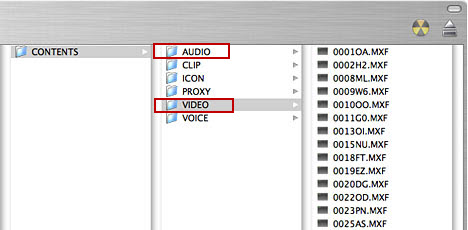
MXF file structure on Panasonic’s P2 card
The above screenshot displays that .MXF clips are all saved in ‘VIDEO’ folder, while audio files are all stored in ‘AUDIO’ folder. When you importing .MXF clips from the correct file structure, the Video Converter for Mac is able to recognize audio tracks from ‘AUDIO’ folder automatically, which ensures the generated ProRes MOV files have both image and sound correctly.
Panasonic AG-HPX170 and FCP workflow – how to convert AG-HPX170 MXF footage to ProRes for use in FCP with optimum performance?
Follow these steps:
Step 1: Run Video Converter for Mac as a professional AG-HPX170 MXF to ProRes Converter. When its main interface comes up, click ‘Add File’ to load source video to it.

Step 2: Select ‘Apple ProRes 422 (*.mov)’ as output format under ‘Final Cut Pro’ column. The ProRes codec is workable in FCP X and its former version FCP 6 and 7.

Important: If you’ve loaded a number of video clips to do batch conversion, please do remember ticking off ‘Apply to All’ option before you start.
Step 3: Adjust video and audio settings (for advanced users)
If necessary, you can click ‘Settings’ button and go to ‘Profiles Settings’ panel to modify video and audio settings like video encoder, resolution, video bit rate, frame rate, aspect ratio, audio encoder, sample rate, audio bit rate, and audio channels. 3D settings are also available.
Step 4: Click ‘Convert’ to start AG-HPX170 MXF video to ProRes MOV conversion.
Step 5: Click ‘Open Folder’ to get generated ProRes 422 QuickTime files for using in Final Cut Pro version 6, 7, or FCP X with optimum performance.
Related posts
How can I import Panasonic HC-X900M AVCHD to FCP (X)?
Importing Panasonic AF100 AVCHD footage to Final Cut Pro
Sony a5100 and FCP X – convert a5100 video files to ProRes
Nikon D5300 to FCP X Converter – encode D5300 MOV to ProRes