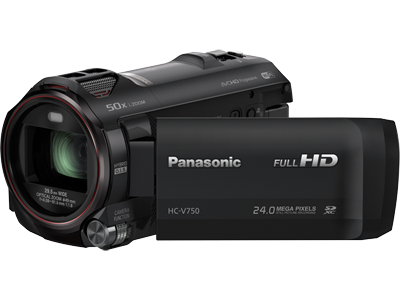
This post elaborates a workflow to transcode Panasonic V750 AVCHD footage into Final Cut ProRes 422 1080p file, so that you can directly import the ProRes files to FCP 6/7 or the later version FCP X for editing without any rendering.

In the beginning of 2014, Panasonic has unveiled five new HD camcorders, the HC-V750, HC-W850, HC-V550CT, HC-V250 and HC-V130. Standing out from the crowd, the top of the range HC-V750 comes with an all-new lens, engine and sensor which combine for high sensitivity, powerful zooming and incredible image quality. The Panasonic HC-V750 shots footage in AVCHD and MP4 format with several recording modes, including:
High Definition AVCHD
1920 x 1080p / 60 fps (28Mbps)
1920 x 1080 (24Mbps)
1920 x 1080 (17Mbps)
High Definition AVCHD
1920 x 1080 (13Mbps)
1920 x 1080 (5Mbps)
High Definition MP4
1920 x 1080p (50Mbps)
1920 x 1080p (28Mbps)
1280 x 720 (9Mbps)
Standard Definition iFrame
960 x 540 (28Mbps)
By using Log & Transfer function, you should be able to open Panasonic V750 AVCHD files in Final Cut Pro, but for some reason, this way doesn’t always work. In addition to FCP’s built in Log & Transfer function, you may also transcode your V750 footage to AppleProRes using 3rd party software like a Panasonic V750 AVCHD Converter. In this post, we are talking about how to convert Panasonic V750 AVCHD footage into FCP ProRes 422 1080p, so that you can bring your footage into FCP without logging and transferring.
Download a free trail of Panasonic V750 to FCP Converter

Transcode Panasonic V750 AVCHD into Final Cut ProRes 422 1080p
Step 1: Run Panasonic V750 AVCHD Video Converter, click ‘Add File’ button to add .mts video files from camcorder, a card reader or a folder stored on your computer that contains the Panasonic V750 AVCHD footage.

Step 2: Click “Format” bar to choose ‘Apple ProRes 422 (*.mov)’ as output format under ‘Final Cut Pro’ column.

Important: If you’ve loaded a number of video clips to do batch conversion, please do remember ticking off ‘Apply to All’ option before you start.
Step 3: Click “Settings” button to custom video and audio parameters on ‘Profile Settings’ panel. Do remember to custom the output resolution (video size) to 1920 x 1080 to acquire Final Cut ProRes 422 1080p effect.
Step 4: Click ‘Convert’ button to start converting Panasonic V750 AVCHD video into Final Cut ProRes 422 1080p on Mac.
Tip: After conversion, you can click “Open Folder” button to get the converted video files.
More about Panasonic AVCHD Converter
* It supports a wide variety of Panasonic cameras and camcorders, including but not limited to:
LUMIX Camera: GF6, DMC-GM1KD, GH3, GX7, GM1, G6, DMC-GX7KS, DMC G6KK, DMC GF6KK, etc.
DV and AVCHD Camcorders: AG-DVX100B, AG-AC7, HDC-Z10000 etc.
HD Camcorders: HC-V750, HC-W850, HC-V550, HC-V250, HC-V130, X920, V520, V110, HC-V100M, HX-WA2A, HC-V10K, HC-V500MK, HC-X900, HC-V110M, etc.
** It is also able to handle AVCHD, MXF, AVI, MOV recordings captured by Canon, Sony, Olympus, Nikon, Panasonic and so on.
*** It features optimal format presets for popular NLEs, such as Final Cut Pro, iMovie, Final Cut Express, Avid Media Composer, Adobe Premiere, etc.
**** It also provides format profile for portable devices like iPad, Galaxy Tab Pro, Kindle Fire HD, Galaxy Note, and more.
Also read
Transcode Panasonic AG-HMC150 MTS to ProRes for importing to FCP
FCP 7 not recognizing my MXF file – convert MXF to ProRes for FCP 7
Convert P2 MXF to ProRes 422 for FCP 6/7/X without losing sound
