Summary: This topic covers how to transfer AVCHD footage to your Mac and how to solve the import issues while loading AVCHD MTS clips into Final Cut Pro 7.
Part 1: Transfer AVCHD footage to Mac
Part 2: Import AVCHD footage to FCP 7
Part 1: How to transfer AVCHD footage to your Mac?
In order to work AVCHD footage in FCP 7, you need to transfer your footage to your Mac in the first place. Briefly speaking, there are two ways available to transfer AVCHD MTS footage to your Mac.
Method 1: Transferring AVCHD MTS footage to your Mac directly from camera
When you are ready to transfer your AVCHD footage from your camera to your computer, the fastest and easiest method is to simply place your camera in PC mode and connect to Mac via a USB cable. Unfortunately, transferring AVCHD footage directly from your camera ties up your camera and precludes you from shooting with it while you are transferring.
Or, you can remove your SD card from the camera for use in an external card reader. Many new Macs now have an SD card slot. Just insert the SD card in the slot. This works the same as a card reader.
Method 2: Copy AVCHD footage to a hard drive before editing
Many people prefer to copy their footage to a hard drive before editing. This is a good practice. Not only does this free up the SD card so that you can use it again after the transfer, but it gives you a back up if you choose to keep the SD card. After you have inserted the SD Card into the USB reader, find the No Name Hard Drive on your desktop.
Important:
You need to copy EVERYTHING from the card, as the structure of folders inside is important. Do not dig inside the folder structure and copy over only certain files you found in there. That is wrong, FCP needs things in the proper order, or it will not work.
Part 2: How to import AVCHD MTS footage into Final Cut Pro 7?
Final Cut Pro version 7 does not comes with native support for AVCHD MTS footage. Luckily, you can use the Log and Transfer window to convert AVCHD footage to an Apple ProRes codec during transferring.
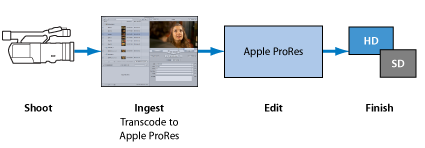
After you have transferred your MTS clips, you can edit using Apple ProRes Codec and output to the format of your choice. In the figure below, you can find the complete process of working AVCHD MTS shootings in Final Cut.
AVCHD has a much higher compression ratio than Apple ProRes, so the ingested files are significantly larger than the original files. For example, a 2-minute native AVCHD file is about 200–300 MB. After transcoding to the Apple ProRes 422 codec, the file size can be as large as 2 GB. To create smaller files during transfer, transcode AVCHD files to Apple ProRes 422 (LT).
If for some reason, FCP refuses to read your AVCHD MTS clips, we recommend 3rd party application such as AVCHD to ProRes Converter for encoding. Please follow the steps below to learn how to transcode AVCHD MTS to ProRes 422 for using in Final Cut Pro 7. (This is also workable for FCP version 6 and FCP X).
1. Free download the AVCHD Converter for FCP 7. Install and run it. Click ‘Add File’ to import your AVCHD footage.

2. From the Format bar, choose ‘Apple ProRes 422 (*.mov) as output format from ‘Final Cut Pro’ column. Apple ProRes 422 is the best suited editing format for using within Apple Final Cut Pro Version 6, 7, or FCP X. To create smaller files, transcode AVCHD files to Apple ProRes 422 (LT).

Important: If you’ve loaded a number of video clips to do batch conversion, please do remember ticking off ‘Apply to All’ option before you start.
The Apple ProRes codecs maintain the highest quality and performance while requiring much less expensive editing and storage hardware (compared to uncompressed video). The Apple ProRes codecs produce video that is indistinguishable from uncompressed HD video and needs less storage space than uncompressed SD video.
3. (Optional) If you intend to modify video and audio settings in your own way, you can click on ‘Settings’ to do so. On the popup ‘Profile Settings’ panel, you are allowed to adjust video and audio parameters such as video codec, video bit rate, frame rate, audio codec, audio bit rate, sample rate and audio channels (up to 6 channels)
4. When ready, click on ‘Convert’ to start encoding AVCHD MTS clips to Apple ProRes 422.
5. When the AVCHD footage transcoding process is complete, click on ‘Open Folder’ button to get the generated ProRes 422 QuickTime files.
Download a free trial of AVCHD MTS to ProRes Converter

Also read
How to open and edit Canon XA10 AVCHD mts in Final Cut Pro?
I couldn’t get Premiere Pro CS6 to recognize audio on MTS files
AVCHD and Avid – Transcode AVCHD to DNxHD for Avid import
Is lossless conversion of AVCHD to AIC for iMovie/FCE possible?
Transcode Canon G30 AVCHD MTS to DNxHD for DaVinci Resolve