Read this post to learn the steps required to import video files from your DSLR camera to Final Cut Pro X for further editing.
It has been a trend that most today’s DSLRs have ability to shoot both vivid images and outstanding video recordings. When you’re ready to edit video that you’ve taken with a DSLR camrea, Final Cut Pro X makes browsing, selecting, importing, and backing up your media fast, direct and easy, even if you’ve already used another application to move the media onto the computer. Read on to take a look at the options you have for ingesting video files captured with a DSLR into FCP X.
The steps to import video files from a DSLR to FCP X on Mac
Step 1: Start up Final Cut Pro X and connect your camera to your Mac.
Here we run Final Cut Pro X v10.0.7 for instance. We use a USB cable to connect our camera to Mac and keep it on.
Step 2: Import videos from your DSLR camera to Final Cut Pro X
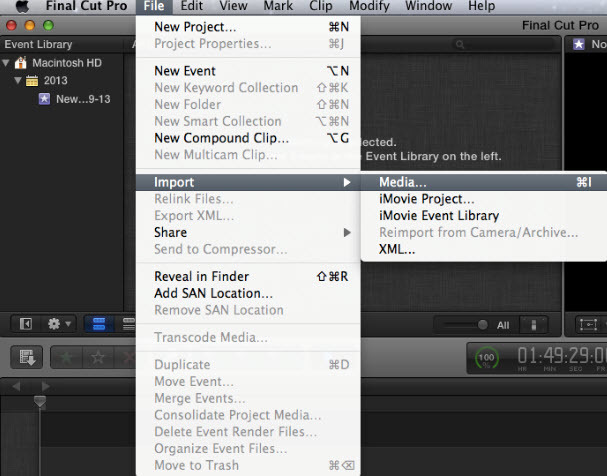
Click File>Import>Media, it will pop up an import window; We can also see Final Cut Pro X supports importing from camera, iMovie Project, iMovie Event Library, but FCP 6/7 projects are not supported.
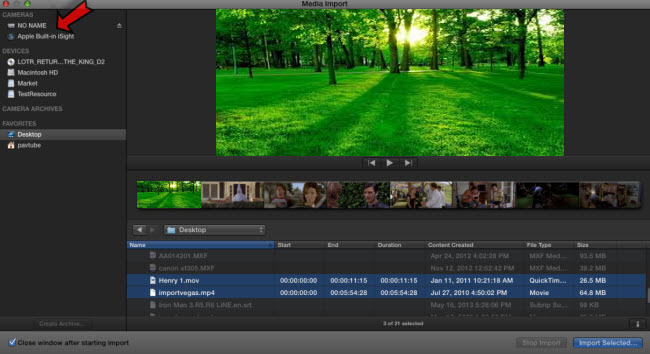
Find your camera on top left, hit Command and click the clips you want to import.
Step 3: Create new event for this importing or add them to existing event.
After checking all the clips you want to import, hit return and free choose to create new event for FCP X or add to existing event. It offers several options to let you optimize video as FCP X prefers, enable Remove silent channels and so on. Check them as your own needs, and then hit return.

Step 4: Edit clips on Timeline.
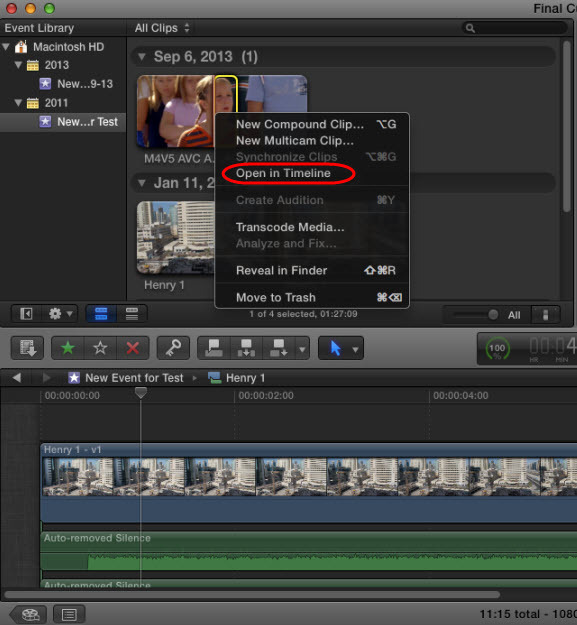
After last hit you will find the clips are showed on the left “All Clips” area. Sliding your cursor to trim out a small part in these clips and hit Shift-Y to add them in timeline; or you can right click it and choose “Open in Timeline”. Check the keyboard shortcuts for editing in Final Cut Pro X.
Ok now you successfully import videos from camera to Final Cut Pro X, new skills get!
Important:
The above workflow is based on the assumption that your camera/camcorder is recognized by FCP X. What if it doesn’t go through as above?
What to do if FCP X cannot recognize your camera as input?
If you’ve connected your camera/camcorder to Mac but the Media Import window doesn’t open, or Final Cut Pro X Can’t control your camera/camcorder, here are some steps that you are suggested to try:
1. Your camcorder or camera should be compatible with Final Cut Pro X. You can visit this page to see Final Cut Pro X supported cameras.
2. You should ensure the camera/camcorder on and well connected to Mac.
3. If you are importing from flash memory devices or from Mac HDD directly, please ensure the files format is MPEG-2, MPEG-4 or AVCHD which are compatible with Final Cut Pro X.
Still have unsupported video issues in FCP X?
If you want to edit video from a camera that FCP X doesn’t recognize, you will need to transcode the videos to a format (ProRes 422 e.g.) that FCP X accepts. You can use HD Video Converter for Mac to convert 4K, 2K, Full HD 1080p/1080i, HD 720p and SD video files in format of AVCHD, MTS, M2T, M2TS, TS, MXF, MKV, H.264, P2 MXF, AVI, MP4, WMV, MOV, M4V, etc. into Apple Prores 422 codec for FCP X editing with optimum performance. From there you can load your converted footage via “File > Import > Files…” instantly without long-time rendering. You don’t need the full card structure, just pick up what you want to keep.
Read more
FCP 7 not recognizing my MXF file – convert MXF to ProRes
How to open and edit Canon XA10 AVCHD mts in Final Cut Pro?
The best way to import Nikon D7000 MOV files to iMovie and FCP X
Sony PXW-Z100 4K XAVC video to FCP and DaVinci Resolve