We write this post to help those who are looking for a smooth workflow for editing EOS 1D-C footage in Final Cut. It explains how to transcode EOS 1D-C files to ProRes for use in FCP with optimum performance.
Canon EOS 1D-C shoots video recordings to QuickTime .MOV format using the Motion-JPEG codec. Most modern NLE’s (FCP X, Avid Media Composer, Premiere CC, etc.) should handle that without problems, but you may want to transcode to an intermediate codec like DNxHD or ProRes if you plan on handing off for VFX, color grading, or finishing work. Here’s a quick tutorial guiding you through how to convert EOS 1D-C footage to ProRes codec for use in Final Cut flawlessly.
EOS 1D-C and FCP workflow: how to encode 1D-C files to ProRes for FCP editing?
Software requirement
HD Converter for Mac

Follow these steps:
Step 1: Install this HD Converter for Mac software on your computer, launch it as a Canon EOS 1D C video converter for Mac and click ‘Add File’ to ingest your source media from your camera or from an achieved folder.
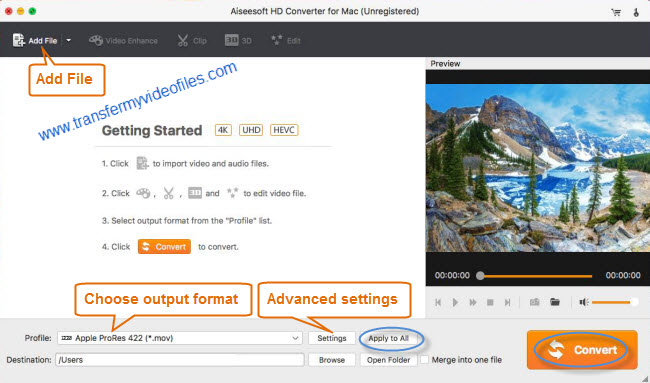
Step 2: Select output format
To convert Canon EOS 1D C video to ProRes for FCP 6/7 or FCP X:
From the Profile bar, move to ‘Final Cut Pro’ catalogue, and select ‘Apple ProRes 422 (*.mov)’ as target format. Apple ProRes is the best suited editing code for FCP 6, 7 and FCP X. When loading them into FCP, you needn’t wait for a long time for rendering.

Step 3: Custom video and audio settings (for advanced users)
Click ‘Settings’ button, the ‘Profile Settings’ window pops up, on which you are allowed to custom video and audio parameters like bit rate, frame rate, resolution, sample rate, and audio channels.
Step 4: Start transcoding Canon EOS 1D C footage to required file type
When ready, click ‘Convert’ to transcode Canon EOS 1D C files to a format that is well suited for your NLEs.
Tips:
You can tick off ‘Shut down computer when conversion completed’ and go away to do other things instead of waiting around in front of the computer for the entire conversion process.
Step 5: Click ‘Open Folder’ button to locate exported QuickTime files
As soon as the conversion process finished, simply click ‘Open Folder’ button to get the generated QuickTime files that encoded with ProRes, AIC or DNxHD codec. Now you are able to open them in Final Cut, iMovie or Avid for further editing without any import issues.
Related posts
E1 Plugin not working for Canon EOS Rebel T4i/650D in FCP 7 L & T
How can I import Canon Rebel T3i / EOS 600D MOV clips into iMovie?
Encoding Canon EOS C500 MXF for FCP and Avid on Mac Mavericks