If you are looking for a good AVCHD to HDV Converter for Mac, you are in the right place. This post displays the steps required to transcode MTS/M2TS files to HDV on Mac via using a helpful and reliable Mac MTS to HDV Converter.
![]()
Why need an MTS to HDV Converter for Mac?
For a quick and smooth workflow, people sometimes need to transcode AVCHD .mts/.m2ts video files to HDV format for use in Final Cut Pro. That’s where an AVCHD to HDV Converter comes in. If googling, you will find there are lots of converter apps out there claimed to have powerful ability to handle AVCHD footage, but only few of them work as advertised. Fortunately, with HD Video Converter for Mac, you are able to encode AVCHD footage to HDV, Apple ProRes, DVCPRO HD, or other formats you request on a Mac maintaining original quality of the .mts/.m2ts files.
HD Video Converter for Mac Features Highlights
– The fastest and easiest solution for AVCHD media to HDV conversion on Mac
– Easily transcode AVCHD (mts, m2ts) files into QuickTime movies with ProRes codec, HDV codec, DVCPRO HD codec, Apple InterMediate codec, DNxHD codec, etc.
– No or minimum generation loss
– Support for all the popular editing formats (ProRes, DNxHD, AIC, HDV, DV AVI, etc) and non-linear editors (Final Cut Pro, FCP X, Avid Media Composer, Adobe Premiere Pro, Apple iMovie, Final Cut Express, DaVinci Resolve, Sony Vegas, etc)

A quick guide on how to convert AVCHD(MTS/M2TS) media to HDV on Mac?
Follow these steps:
Step 1: Run HD Video Converter for Mac as a professional AVCHD to HDV Converter for Mac. When its main interface comes up, click ‘Add File’ to load source video to it.

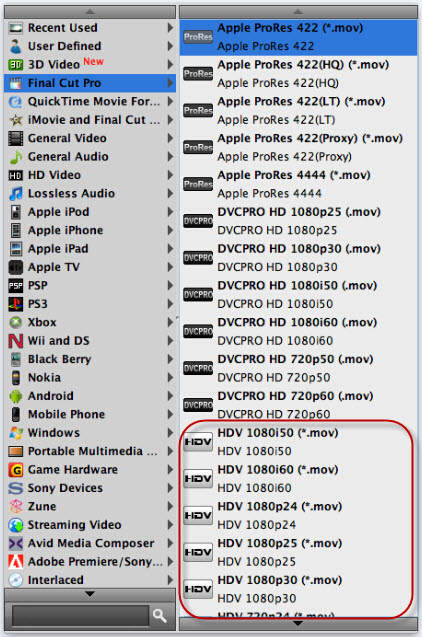
Step 2: Select ‘HDV (*.mov)’ as output format for opening with FCP (X)
From the ‘Profile’ list, move to ‘Final Cut Pro’ catalogue, and select one of the ‘HDV (*.mov)’ profiles as target format. You can also choose ‘Apple ProRes (*.mov)’ or ‘DVCPRO HD (*.mov)’ as output format for use in Final Cut.
Important: If you’ve loaded a number of video clips to do batch conversion, please do remember ticking off ‘Apply to All’ option before you start.
Step 3: Adjust video and audio settings (for advanced users)
If necessary, you can click ‘Settings’ button and go to ‘Profiles Settings’ panel to modify video and audio settings like video encoder, resolution, video bit rate, frame rate, aspect ratio, audio encoder, sample rate, audio bit rate, and audio channels. 3D settings are also available.
Step 4: Click ‘Convert’ to start AVCHD footage to HDV MOV conversion.
Step 5: Click ‘Open Folder’ to get generated HDV QuickTime files for transferring and editing in Final Cut Pro X/7/6 with optimum performance.
Related posts
How to rewrap Sony XDCAM/XDCAM HD/XDCAM EX to MOV?
Sony a5100 and FCP X – convert a5100 video files to ProRes
Sony A7S XAVC S and AVCHD video files import issue in iMovie
Sony Handycam FDR-AX100 XAVC S and FCP workflow on Mac
How to import Sony F55/F5 CineAlta 4K XAVC to FCP without plugin?