This will be a quick guide to get you ready to edit in Final Cut Pro 7 from non-FCP 7 compatible video files. It guides you through the process of transcoding non-FCP 7 compatible video files into ProRes that can work the best in FCP 7.

Which is the best editing codec for the FCP 7 workflow?
“Hi there, I need to convert some non-FCP 7 compatible XAVC S video files into a format that can work the best in my FCP 7. I want a format/codec that does not need to be rendered again and again in FCP 7 once it is imported and I want the file size as small as possible. Any suggestions? Thanks in Advance!!!”
Apple ProRes codec will be the best option for you. But one thing you need to notice is that there is no way to make ProRes without the file size increase. ProRes LT is as light as you get…unless you use the low quality ProRes Proxy, which is meant for use not at full quality, for relinking to master footage later.
You need third-party converter software to process ProRes file conversion. One that does what you need is HD Video Converter for Mac. It works with a wide variety of file formats, including Ultra HD 4K, 2K, and 1080p video files in format of XAVC S, XAVC, XF-AVC, XDCAM (HD/EX), MXF, AVCHD (.MTS/M2TS), MP4, MOV, AVI, MKV, etc. and provides tons of output formats for users to choose from, such as Apple ProRes, DVCPRO HD, HDV, Apple InterMediate Codec, DNxHD and more.
Download a demo of HD Video Converter for Mac to see if it is able to do what you want.

How to convert videos to ProRes codec for FCP 7 editing?
Follow these steps:
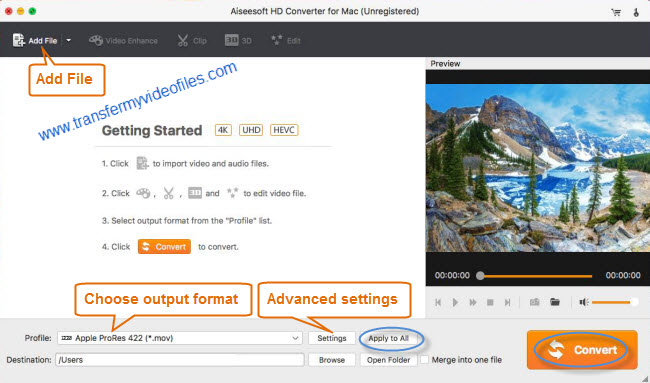
Step 1: Run HD Video Converter for Mac as a professional ProRes Converter for FCP 7. When its main interface comes up, click ‘Add File’ to load source video to it.

Step 2: Select ‘Apple ProRes 422 (*.mov)’ as output format for opening with FCP 7
From the ‘Profile’ list, move to ‘Final Cut Pro’ catalogue, and select ‘Apple ProRes 422 (*.mov)’ as target format. Apple ProRes is the best suited editing codec for FCP 7 and it latest version FCP X. When loading them into FCP 7/X, you needn’t wait for a long time for rendering. For smaller file size, you can choose ProRes LT as target.

Important: If you’ve loaded a number of video clips to do batch conversion, please do remember ticking off ‘Apply to All’ option before you start.
Step 3: Adjust video and audio settings (for advanced users)
If necessary, you can click ‘Settings’ button and go to ‘Profiles Settings’ panel to modify video and audio settings like video encoder, resolution, video bit rate, frame rate, aspect ratio, audio encoder, sample rate, audio bit rate, and audio channels. 3D settings are also available.
Step 4: Click ‘Convert’ to start video to ProRes MOV conversion for FCP 7.
Step 5: Click ‘Open Folder’ to get generated ProRes QuickTime files.
You are now ready to edit in Final Cut Pro 7 with optimum performance.
After you have transcoded from another format to an Apple ProRes codec, you can take advantage of the exceptional real-time playback performance of Apple ProRes files. And you don’t need to constantly waste your time in rendering and re-rendering, this greatly enhance your productivity.
To import the transcoded files into Final Cut Pro 7, simply navigate to File > Import > Files and select the converted clips. Alternately you can simply drag and drop the files into your “Bin.” Note that this process using Compresor replaces the need to “Log and Transfer” as you would with typical camcorders.
Related posts
FCP 7 not recognizing my MXF file – convert MXF to ProRes
Convert P2 MXF to ProRes for FCP 6/7/X without losing sound
How to convert Sony AX100 XAVC S files for editing on Mac?
A smooth workflow for Sony PXW-X70 XAVC Long and FCP X
