This post is writing for people who are having issues while editing .mov video files in Sony Movie Studio. It explains an easiest way to convert .mov footage to MPEG-2 (*.mpg) for editing in Sony Movie Studio fluidly.
Issues you may meet while using .MOV files in Sony Movie Studio
Video goes black, but audio plays fine: “Sony Movie Studio 12.0 is consistently showing a black preview screen and black rendering of .MOV clips after I put a certain number of source files in my project media bins or clips on the timeline, and the program even crashes and shuts itself down. Although the video goes black in the preview and also the renders, the audio still plays perfectly fine. The cursor moves along the timeline and the frame numbers and time advances on the controls under the preview window.”
Vegas Movie Studio won’t play .MOV files: “Vegas Movie Studio won’t play .MOV files. Nether files from my iPad mini, my girlfriend’s Canon EOS 70D or the MOV from my Nikon D810. I tried the latest quicktime, but no luck.”
Vegas Movie Studio won’t allow me to import .mov files: “I ordered a Canon EOS 5D Mark III DSLR two weeks ago. It records video files in .mov recording format. My problem is that, my editing software (Vegas Movie Studio) won’t allow me to import .mov files. My wife’s Olympus captured to .avi so no problems at all. Is there a way to allow me to import both .avi and .mov?”
The easiest way to solve MOV issues in Sony Movie Studio?
Convert MOV files to MPEG-2! This is the easiest and most efficient way to make Sony Movie Studio work with MOV files without crashes or other glitches.
Software requirement
Video Converter


How to convert MOV files to MPEG-2 for Sony Movie Studio?
To do this:
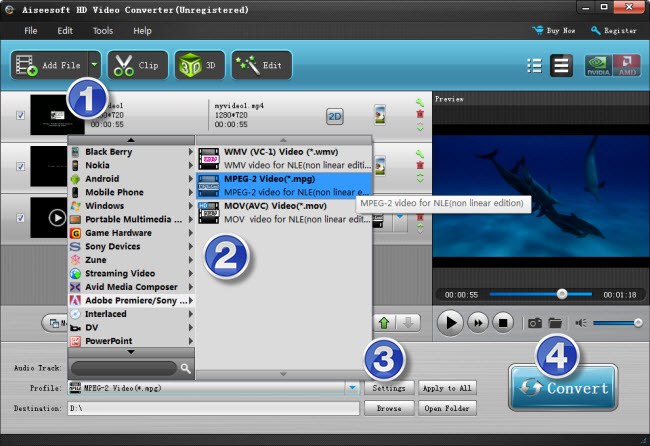
Step 1: Start up Video Converter as a professional MOV to Sony Movie Studio Converter. Click ‘Add File’ to import your source media to the program.

Step 2: Select output format
Click the drop-down list besides ‘Profile’, choose ‘Adobe Premiere/Sony Vegas > MPEG-2 Video (*.mov)’ as the most compatible format for Movie Studio with best quality.
Important: If you’ve loaded a number of video clips to do batch conversion, please do remember ticking off ‘Apply to All’ option before you start.
Step 3: Custom video and audio settings (for advanced users)
If necessary, you can click ‘Settings’ button and go to ‘Profiles Settings’ panel to modify video and audio settings like video encoder, resolution, video bit rate, frame rate, aspect ratio, audio encoder, sample rate, audio bit rate, and audio channels. 3D settings are also available.
Step 4: When ready, click ‘Convert’ to start transcoding .mov files to Sony Movie Studio supported MPEG-2 format. As soon as the conversion is complete, click ‘Open File’ button to locate the generated files and now you are able to open them in Vegas Movie Studio easily for further editing.
Related posts
How do I import H.264 .mov videos to Magix Movie Edit Pro?
Transfer Nikon D750 MOV footage to Mac iMovie, FCE, & FCP X
How can I batch convert EX1 MP4 files to ProRes for Final Cut?
Do I need to convert Canon EOS 70D MOV to ProRes for FCP X?
