What’s the best workflow between Sony Vegas and MXF video files? If you are looking for an answer to this question, you may have interest in this post. It provides a remedy for people who are having issues while using MXF/P2 MXF footage in Sony Vegas.
Needed to convert .mxf video files for use with Sony Vegas
”Hi, fellows, I’m wondering if you can help. We are a production company supplying sports content for major broadcasters and websites worldwide. We have just bought a number of Canon XF 100 and 300 cameras and needed a converter to convert their .mxf files for use with Sony Vegas, which is what most of our Video Journalists use. Does anyone know a good batch MXF converter? Appreciate any recommendations. Thanks.”
If you are shooting with a Canon XF100, XF105, XF300, XF305, C300 or Panasonic P2 HD camcorder, you may probably have the same needs to convert MXF footage for editing in Sony Vegas. In the guide below, we would like to display a step-by-step guide on how to convert MXF files for use in Sony Vegas maintaining the original quality of the .mxf files.
Software requirement
Video Converter


Sony Vegas workflow with MXF footage – how to convert MXF files for editing in Sony Vegas?
To do this:
Step 1: Start up Video Converter as a professional MXF to Sony Vegas Converter. Click ‘Add File’ to import your source media to the program.
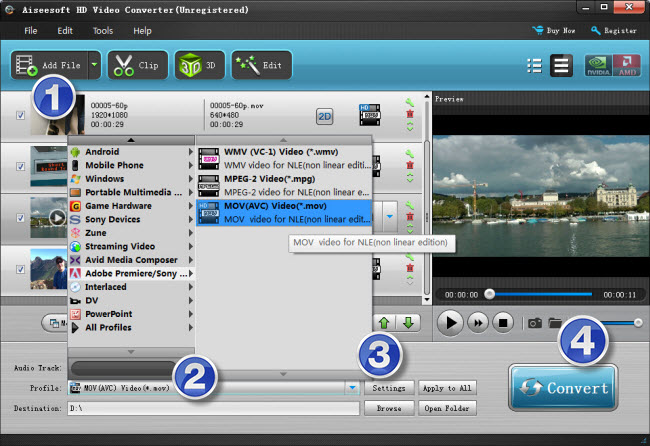
Step 2: Select output format
Click the drop-down list besides ‘Profile’, choose ‘Adobe Premiere/Sony Vegas > MOV (AVC) (*.mov)’ as the most compatible format for Vegas with best quality. You can choose ‘MPEG-2 (*.mpg)’, or ‘WMV (VC-1) (*.wmv)’ as well.
This method is also available when you want to edit MXF/P2 MXF files in Adobe Premiere Pro and After Effects.
Important: If you’ve loaded a number of video clips to do batch conversion, please do remember ticking off ‘Apply to All’ option before you start.
Step 3: Custom video and audio settings (for advanced users)
If necessary, you can click ‘Settings’ button and go to ‘Profiles Settings’ panel to modify video and audio settings like video encoder, resolution, video bit rate, frame rate, aspect ratio, audio encoder, sample rate, audio bit rate, and audio channels. 3D settings are also available.
Step 4: When ready, click ‘Convert’ to start transcoding MXF/P2 MXF files to Sony Vegas supported MOV/WMV/MPG format. As soon as the conversion is complete, click ‘Open File’ button to locate the generated files and now you are able to open them in Vegas easily for further editing.
Related posts
Why Adobe Premiere Pro CS6 can’t import MXF video files?
How can I import MXF footage into Avid Media Composer?
FCP 7 not recognizing my MXF file – convert MXF to ProRes
Convert P2 MXF to ProRes for FCP 6/7/X without losing sound