This post will guide you through the process of converting Sony HDR-TD10 3D AVCHD footage to ProRes 422 for use in FCP X smoothly. If you are having issues editing HDR-TD10 3D AVCHD content in FCP X, you may wish to read this post.

The Sony HDR-TD10 High Definition consumer 3D Handycam Camcorder is set to expand the world of 3D while redefining the meaning of home video. Up until now, high quality 3D image capturing was only possible with professional cameras, but with the HDR-TD10, anyone can shoot stunningly beautiful Full HD 3D videos. From the occasional big moments, to the day-to-day small moments, you can now capture all that in Full HD 3D.
The HDR-TD10 Handycam camcorder utilizes two Full HD sensors for capturing true 1920×1080 3D video delivering an immersive 3D experience, as well as Full HD 2D video. The HDR-TD10 camcorder makes MVC format 3D files, which are high end AVCHD files with Full HD resolution. This is the same format as the 3D Blu-rays you see in the stores.
If for some reason you are unable to work with HDR-TD10 3D AVCHD in FCP X fluidly, you are suggested to transcode them first. This requires third party software like HD Converter for Mac. Read on to discover a step-by-step guide on how to convert Sony HDR-TD10 3D AVCHD footage to ProRes 422 for use in FCP X with optimum performance.
Here’s what you need
HD Converter for Mac

[Guide] How to transcode Sony HDR-TD10 3D AVCHD video files for FCP X editing with Apple ProRes codec?
Follow these steps:
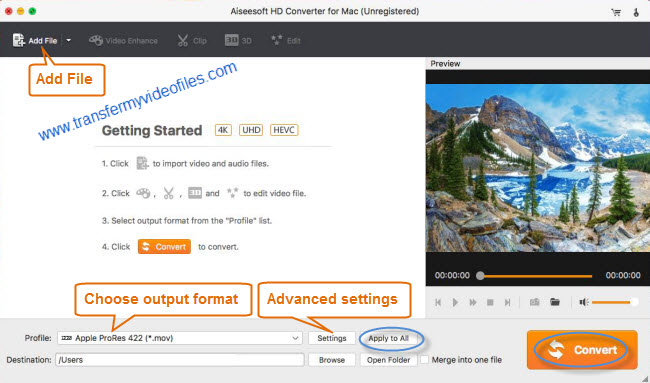
Step 1: Open up HD Converter for Mac as a Sony HDR-TD10 3D AVCHD Converter for FCP X. When its main interface comes up, click ‘Add File’ to load your source media.

Step 2: Select ‘Apple ProRes 422 (*.mov)’ as output format for opening with FCP X
From the ‘Profile’ list, move to ‘Final Cut Pro’ catalogue, and select ‘Apple ProRes 422 (*.mov)’ as target format. Apple ProRes is the best suited editing codec for FCP X and its former version FCP 6 and FCP 7. When loading them into FCP X/6/7, you needn’t wait for a long time for rendering.

Important: If you’ve loaded a number of video clips to do batch conversion, please do remember ticking off ‘Apply to All’ option before you start.
Step 3: Custom video and audio settings (optional)
If necessary, you can click ‘Settings’ button and go to ‘Profiles Settings’ panel to modify video and audio settings like video encoder, resolution, video bit rate, frame rate, aspect ratio, audio encoder, sample rate, audio bit rate, and audio channels. 3D settings are also available.
Step 4: Begin Sony HDR-TD10 3D AVCHD to MOV Conversion on Mac
When ready, click ‘Convert’ to start format conversion. Once the conversion process is complete, you can click ‘Open Folder’ button to get the generated ProRes MOV files for editing in FCP X without a hassle.
Tips:If you don’t want to wait for the entire conversion process, you can tick off ‘Showdown computer when conversion completed’ and go away to do other things.
Related posts
How to open and edit Canon XA10 AVCHD mts in Final Cut Pro?
I couldn’t get Premiere Pro CS6 to recognize audio on MTS files
AVCHD and Avid – Transcode AVCHD to DNxHD for Avid import
Is lossless conversion of AVCHD to AIC for iMovie/FCE possible?
Transcode Canon G30 AVCHD MTS to DNxHD for DaVinci Resolve
