Summary: Can’t get Premiere Pro CS6 to recognize audio on MTS videos? Looking for the best way to import AVCHD footage to Premiere Pro without losing sound? This guide details what to do when you facing troubles while editing AVCHD MTS clips in Premiere Pro CS6.
Premiere Pro CS6 not recognizing AVCHD .MTS audio
“Hi, there, I couldn’t get Premiere Pro CS6 to recognize audio on MTS videos, can you help please? I’m using the Canon Legria HF G10 for Wedding and personal videos, with PAL settings 50i (Interlaced) frames on the highest quality. But when I import the MTS clips into Premiere Pro CS6, I get a great video without voice. I could not find anything on Sony or Adobe support sites. Do I need third party software to convert the AVCHD MTS files to a format that will work with Premiere Pro CS6? Does anyone know the fix? Thanks.”
The best workflow to import AVCHD MTS to Adobe Premiere Pro
IfPremiere Pro CS6 is unable to open audio in AVCHD MTS files, you can try out HD Video Converter to transcode AVCHD MTS to DNxHD for Premiere (if you are on a Windows PC) or encode AVCHD MTS to Apple ProRes for Premiere (if you are on an Mac computer).
Download a free trial of HD Video Converter


The steps required for rewrapping AVCHD MTS to Premiere Pro editable files using HD Video Converter
Step 1: Start up HD Video Converter as an AVCHD to Premiere Pro Converter.
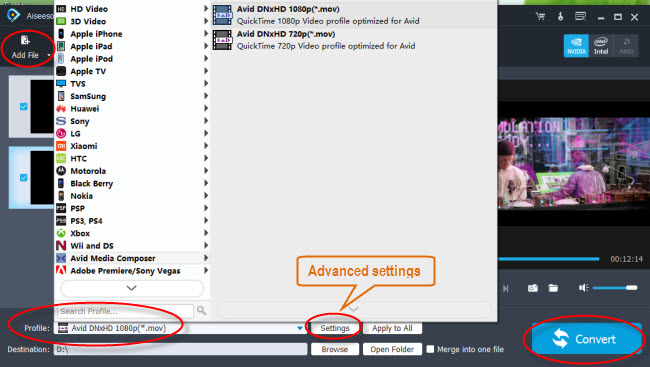
Step 2: Click ‘Add File’ to import your source media to the program.

Step 3: Select output format
* If you are on a Windows PC, from the format bar, choose ‘Avid DNxHD 1080p (*.mov)’ as output under ‘Avid Media Composer’ column.
** If you are on a Mac computer, from the format bar, choose ‘Apple ProRes 422 (*.mov)’ as target under ‘Final Cut Pro’ catalogue.

Important: If you’ve loaded a number of video clips to do batch conversion, please do remember ticking off ‘Apply to All’ option before you start
Step 4: Custom video and audio settings (for advanced users)
Click ‘Settings’ button, the ‘Profile Settings’ panel pops up, on which you are able to modify video and audio settings like resolution, bit rate, frame rate, sample rate and audio channel.
Step 5: When ready, click ‘Convert’ to start transcoding AVCHD files to Premiere Pro CS6 supported QuickTime MOV format. As soon as the conversion complete, click ‘Open Folder’ button to locate the generated files and now you are able to open them in PP CS6 for further editing without losing sound.
Related posts:
Why Adobe Premiere Pro CS6 can’t import MXF files?
Avid and Red Epic Workflow – transcode Epic footage to DNxHD
Edit Blackmagic 4K footage in iMovie, FCP, Avid, and Premiere Pro
