Here is the quick guide on how to convert Canon EOS-1D X Mark II footage for use in Sony Vegas. If you are having issues working with EOS-1D X II 4K/1080p files in Vegas, you can take a look at it.
The new Canon EOS-1D X Mark II DSLR camera features a full-frame 20.2MP CMOS sensor and dual DIGIC 6+ image processors, which contribute to fast continuous shooting rates up to 16 fps in live view, 14 fps with full-time AF and AE, and an expanded sensitivity range from ISO 50-409600. The sensor and processor combination also avails DCI 4K video recording at 60 fps and Full HD 1080p recording at 120 fps, along with the ability to record on-board to a CFast 2.0 memory card or via HDMI to an optional external recorder.
For a faster and more fluid workflow, users sometimes need to transcode EOS-1D X II 4K/1080p footage for use in Sony Vegas seamlessly. Here is how.
How to convert Canon EOS-1D X Mark II footage for use in Sony Vegas?
Software requirement
HD Video Converter


With HD Video Converter installed, you can create optimized files for editing in Vegas. Read on to learn the detailed steps on how to convert EOS-1D X II 4K/1080p files for editing in Vegas with optimum performance.
Follow these steps:
Step 1: Start up HD Video Converter as a professional EOS-1D X II Video to Vegas Converter. Click ‘Add File’ to import your source media to the program.
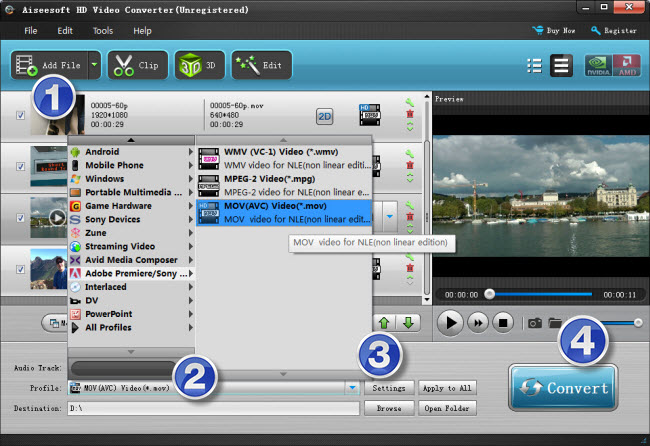
Step 2: Select output format
Click the drop-down list besides ‘Profile’, choose ‘Adobe Premiere/Sony Vegas > MOV (AVC) (*.mov)’ as the most compatible format for Vegas with best quality. You can choose ‘MPEG-2 (*.mpg)’, or ‘WMV (VC-1) (*.wmv)’ as well.
This method is also available when you want to edit Canon EOS-1D X Mark II footage in Adobe Premiere Pro CC/CS5/CS6 and Adobe After Effects.
Important: If you’ve loaded a number of video clips to do batch conversion, please do remember ticking off ‘Apply to All’ option before you start.
Step 3: Custom video and audio settings (for advanced users)
If necessary, you can click ‘Settings’ button and go to ‘Profiles Settings’ panel to modify video and audio settings like video encoder, resolution, video bit rate, frame rate, aspect ratio, audio encoder, sample rate, audio bit rate, and audio channels. 3D settings are also available.
Step 4: When ready, click ‘Convert’ to start converting Canon EOS-1D X Mark II footage to Vegas supported format. As soon as the conversion is complete, click ‘Open File’ button to locate the generated files and now you are able to open them in Vegas easily for further editing.
Related posts
Import Sony A7S II XAVC-S 4K footage to Sony Vegas Pro
EOS-1D X II to Avid-import EOS-1D X II 4K/1080P to Avid
EOS-1D X II in Premiere-import 1D X II 4K/1080P to Premiere
Canon EOS-1D X II to Pinnacle-edit1D X II 4K/1080P in Pinnacle