Does Premiere Elements include native support for HEVC (H.265) video files? Unfortunately, the answer is “NO”, at least for now. You can’t edit the H.265 codec with Premiere Elements. It’s just not designed to do it. Fortunately, with a little workaround, you can still use HEVC footage in Premiere Elements.

Premiere Elements 2018 won’t recognize my HEVC footage
“Hi there, I recently purchased the bundled photoshop/premiere elements 2018 (current updates applied). Unfotunately, I discovered that the high quality high frame rate footage taken with my GoPro Hero 6 is not compatible with premiere elements 2018. I have a Macbook Pro 15 inch 2016 with 2.7 i7, 16 GB Ram and Radeon Pro 460 4 GB. Does the new version 2018 already contain H.265 HEVC support? How can I use the HEVC footage in Elements 2018? Can anyone please help?”
Can’t figure out a way to import HEVC H.265 footage into Premiere Elements? Actually, Premiere Elements doesn’t have native support for HEVC/H.265 files. To be able to edit HEVC H.265 video files in Premiere Elements, at the present time, you will need to transcode them first. Check out a way of converting HEVC/H.265 files to DNxHD codec for use in Premiere Elements smoothly.
How to encode HEVC videos to the DNxHD codec for Adobe Elements 2018?
Here’s what you need
HD Video Converter
You can download a demo version (for both, PC and Mac) to have a try. They are not free but it is totally worth it.


Follow these steps:
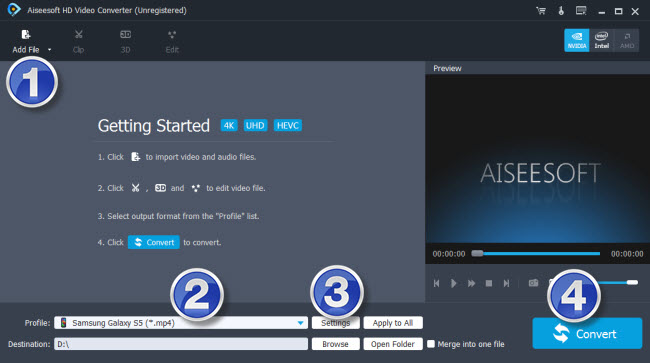
Step 1: Start up HD Video Converter as an HEVC to Premiere Elements converter. When its main interface pops up, click ‘Add File’ to input your source media.

Step 2: Choose output format for Premiere Elements
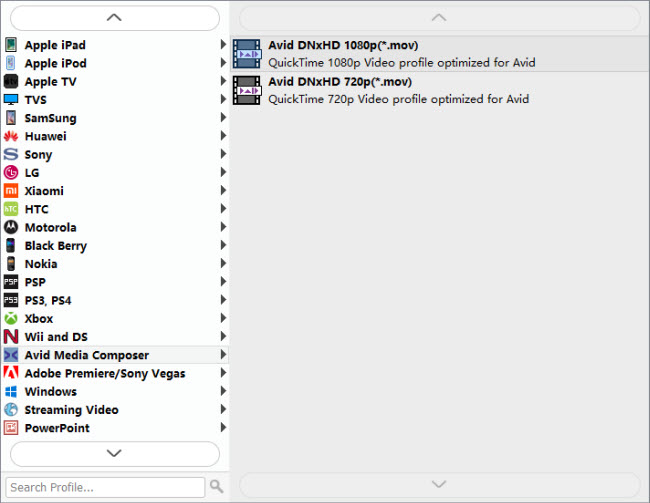
From ‘Profile’ list, select ‘Avid DNxHD (*.mov)’ as output format under ‘Avid Media Composer’ column. This DNxHD profile is suitable for use in Premiere Elements and other NLEs like Avid Media Composer, Adobe Premiere Pro, Premiere Elements, DaVinci Resolve, Edius and more.

Important: If you’ve loaded a number of video clips to do batch conversion, please do remember ticking off ‘Apply to All’ option before you start.
Step 3: Custom video and audio settings
If necessary, you can click ‘Settings’ button and go to ‘Profiles Settings’ panel to modify video and audio settings like video encoder, resolution, video bit rate, frame rate, aspect ratio, audio encoder, sample rate, audio bit rate, and audio channels. 3D settings are also available.
Step 4: Start HEVC x265 to DNxHD Conversion for Premiere Elements
When ready, click ‘Convert’ to start format conversion. As soon as the conversion is complete, you can click ‘Open Folder’ button to get the exported DNxHD MOV files for use in Premiere Elements 2018 with optimum performance.
Related posts
AVCHD MTS no audio in iMovie on High Sierra
HEVC codec installed: Premiere not importing HEVC
Issues editing HEVC H.265 video in Vegas Pro 14/15 [Solved]
Media Encoder HEVC export – convert AME output to X265
