Encounter “Codec missing or unavailable” issues loading MOV files into Adobe Premiere Pro? Check out a workaround to solve the issue in this post.
As a container format, MOV can contain data encoded using various compression and encoding schemes. Premiere Pro can import MOV container files, but the ability to import the data that they contain depends on the codecs (specifically, decoders) installed. In this post, we explain a workaround to solve the problem of “Codec missing or unavailable” dealing with MOV video files in Premiere.
MOV in Premiere CC 2017: Codec missing or unavailable
“I’m using Adobe Premiere Pro CC 2017 on Windows 10. When I try to import a .mov file from an iPhone 8, I get an error saying ‘Codec missing or unavailable’. I have already installed the latest QuickTime but there’s a no go. Is there a workaround to use my iPhone video with good performance in Premiere? Thanks for your thoughts.”
By installing more codecs, you can extend the ability of Premiere Pro to import extra file types. Many codecs installed into the operating system (Windows or Mac OS) work as a component inside the QuickTime or Video for Windows formats. However, it is a known issue that Premiere Pro doesn’t support HEVC .mov footage shot on iOS devices. That’s why you encounter “Codec missing or unavailable” issues. At the moment, transcoding the MOV files to ProRes or DNxHD using HD Video Converter before you start editing would be a workable solution. Here is a guide teaching you how to do this step by step.
How to encode MOV video for use in Premiere Pro fluently?
Here’s what you need
HD Video Converter
You can download a demo version (for both, PC and Mac) to have a try. They are not free but it is totally worth it.


Simply follow these steps:
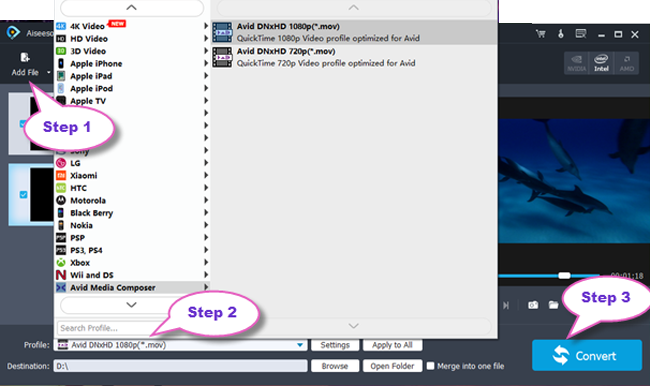
Step 1: Click “Add File” to load MOV files into this program.
Step 2: Select output format from “Profile” list.
If your Premiere is Windows based, simply select “Avid Media Composer” > “Avid DNxHD 1080p(*.mov)” as output format.
If your Premiere is Mac based, simply choose “Final Cut Pro” > “Apple ProRes 422 (*.mov)” as output format.

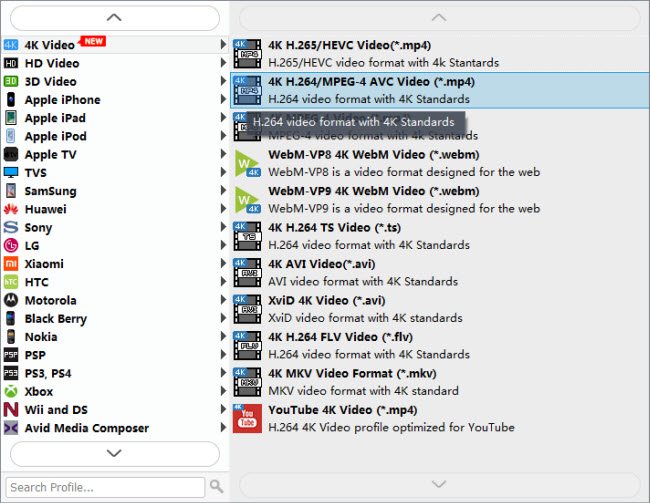
Note that this converter program can only output Apple ProRes and DNxHD video up to 1080p, if you want to preserve 4K quality of your source files, you need to select “4K Video” > “4K H.264/MPEG-4 AVC Video (*.mp4)” as target format. To export 4K files, please make sure your computer has enough power to process 4K. If not, simply select Apple ProRes or DNxHD as output format depending on your OS.
Step 3: Click “Convert” to start format conversion.
As soon as the conversion is finished, click “Open Folder” to get the converted files for use in Adobe Premiere Pro with optimum performance.
Also read
High Sierra HEVC to ProRes Converter
HEVC in LG TV-how to directly play x265 video on LG TV?
iPhone X HEVC in Premiere-import iPhone X H265 to Premiere
HEVC Premiere Elements 2018-import H.265 to Elements 2018