Having issues only channel 1 appearing on Premiere CS6 importing Sony PMW-200 files? This post presents a workaround to make Sony PMW-200 audio files editable in Premiere Pro CS6.
How can I work with Sony PMW-200 channel 2 audio in Premiere Pro CS6?
“We just bought a Sony PMW 200 camcorder and did some shoot (an interview) with the FAT XDCAM EX MP4 file format with channel 2. Channel 1 was not used. But when I imported the files into Premiere Pro CS6, no audio wave is shown. Whatever we changed the preference and setting, the audio channel did not appear. It’s very strange that the video playback on camcorder and VLC player on computer plays audio just fine, and we just cannot edit the audio. We then filmed another clip in channel 1, and that is working fine, the audio in channel 1 is showing up on the timeline, we have not had any issues using it. What’s wrong with this? Why the audio in channel 2 doesn’t appear? How to resolve this issue? Can anyone tell us what should we do in order to work with Sony PMW-200 channel 2 audio in Premiere Pro CS6? Please advice. It’s very urgent. Thanks!!!”
There are lots of people having issues editing Sony PMW-200 footage shoot with the 4 channels audio in Premiere Pro CS6. Fortunately, there are workarounds to resolve the issue. Check the short tutorial below to learn a way of converting PMW-200 footage to ProRes/DNxHD codec for use in Premiere Pro CS6 with desired audio track.
Here’s what you need
HD Video Converter (it comes with Windows and Mac version, please download the correct version depending on your computer system)


How to convert Sony PMW-200 files to QuickTime for editing in Premiere with desired audio track?
The steps:
Step 1: Start up HD Video Converter as a Sony PMW-200 Video Converter for Premiere. When its main interface pops up, click ‘Add File’ to input your source media.
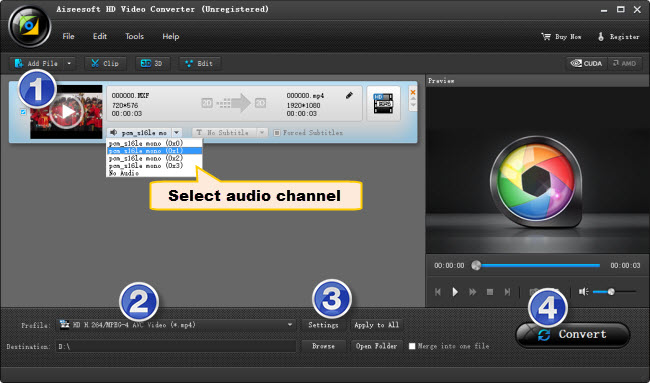
When the video files are loaded, you can click the dropdown list of audio to choose your required audio track. The selected audio track will be preserved in the output files. You can also extract desired audio track and convert them to AAC, AC3, DTS, WMA, AIFF, OGG, MKA, AU, FLAC, etc.
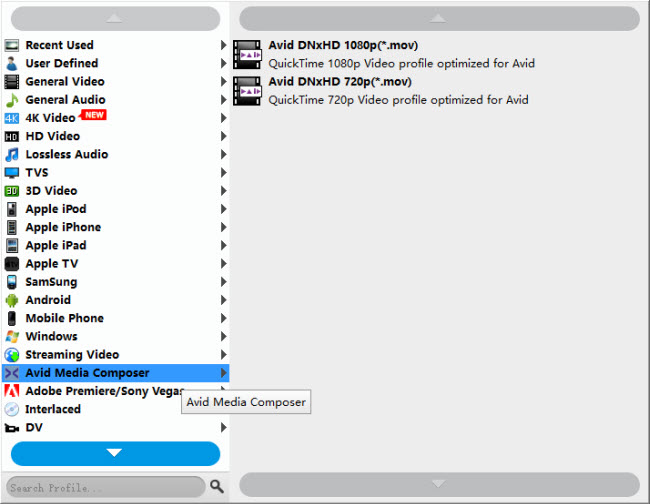
Step 2: Choose output format Premiere
1) For the purpose of converting Sony PMW-200 files for editing in Premiere Windows version with required audio track, from ‘Profile’ list, choose ‘Avid DNxHD (*.mov)’ as output format under ‘Avid Media Composer’ column.
2) To convert Sony PMW-200 media for editing in Adobe Premiere Mac version with required audio track, from ‘Profile’ list, select ‘Apple ProRes 422 (*.mov)’ as output. The ProRes codec is best suited for editing in FCP X and its former version FCP 6 and FCP 7. Additionally, the ProRes codec can also be imported to Premiere Pro and DaVinci Reslove for editing without a glitch.

Note: Only Mac version has the ‘Final Cut Pro’ profile.
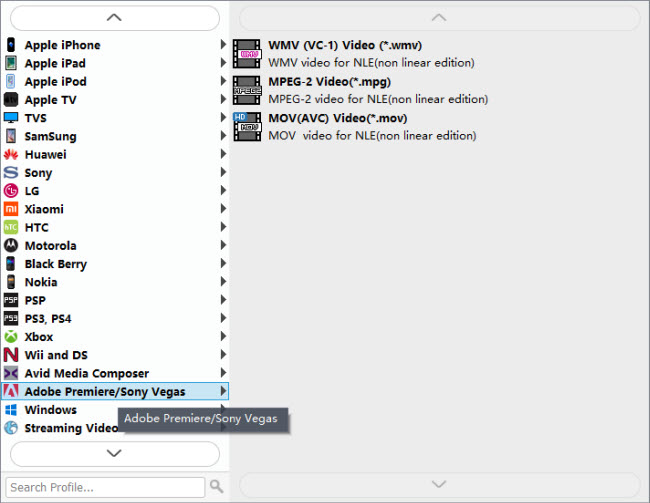
In addition to DNxHD and ProRes, you can also select ‘MOV (AVC) (*.mov)’ as output format under ‘Adobe Premiere/Sony Vegas’ option.
This method is also available when you want to edit Sony PMW-200 files in After Effects and Sony Vegas.
Important: If you’ve loaded a number of video clips to do batch conversion, please do remember ticking off ‘Apply to All’ option before you start.
Step 3: Custom video and audio settings
If necessary, you can click ‘Settings’ button and go to ‘Profiles Settings’ panel to modify video and audio settings like video encoder, resolution, video bit rate, frame rate, aspect ratio, audio encoder, sample rate, audio bit rate, and audio channels. 3D settings are also available.
Step 4: Start Sony PMW-200 files to QuickTime MOV Conversion with desired audio track
When ready, click ‘Convert’ to start format conversion. As soon as the conversion is complete, you can click ‘Open Folder’ button to get the exported MOV files for use in Premiere or FCP and Avid with optimum performance.
Related posts
Why Adobe Premiere Pro CS6 can’t import MXF video files?
Import JVC GY-HM200 AVCHD/MOV 4K to Avid, Premiere, Vegas
Edit FDR-AX100 4K XAVC S/1080p AVCHD in iMovie, FCE, FCP & Avid
How to import Sony F55/F5 CineAlta 4K XAVC to FCP without plugin?