Having issues editing or renaming XDCAM HD/EX clips in Adobe Premiere Pro? Read this post to learn an alternative way to rename XDCAM HD/EX clips for Premiere Pro.
Sony EX1 XDCAM EX Workflow with Premiere Pro CS6
“We are making the switch from FCP7 to Adobe CS6, and we have a few questions.
Our original workflow was:
Import Ex-1 XDCAM footage using XDCAM Transfer, save in a project folder.
Use Adobe Bridge to Batch Rename all files
Import to FCP7 and Edit.
Now, with CS6, We aren’t exactly sure how our workflow should go. We copy the BPAV folder to our project folder on the local hard drive, then in Premiere, we can navigate to, import and edit that footage. But all the files are still named numbers from the camera. We would prefer to rename all of our clips before the import process, but using Bridge with the BPAV folder structure doesn’t work so well anymore.
We can’t be the only shop running into this issue, is there someone out there that can offer a meaningful solution? Thanks!”
(Question credit: https://forums.creativecow.net/)
Adobe Premiere Pro doesn’t support batch renaming of XDCAM EX/HD prior to import. Fortunately, there are workarounds to go through this. If you install HD Video Converter, you will be able to convert XDCAM EX/HD footage to DNxHD or ProRes codec for use in Premiere flawlessly, before that, it allows you to rename all your XDCAM EX/HD clips. Check the short tutorial below to learn the details on how to do this.
How to convert and rename XDCAM HD/EX clips for Premiere?
Here’s what you need
HD Video Converter
You can download a demo version (for both, PC and Mac) to have a try. They are not free but it is totally worth it.


Follow these steps:
Step 1: Start up HD Video Converter as a professional XDCAM Converter for Premiere. When its main interface pops up, click ‘Add File’ to input your source media.
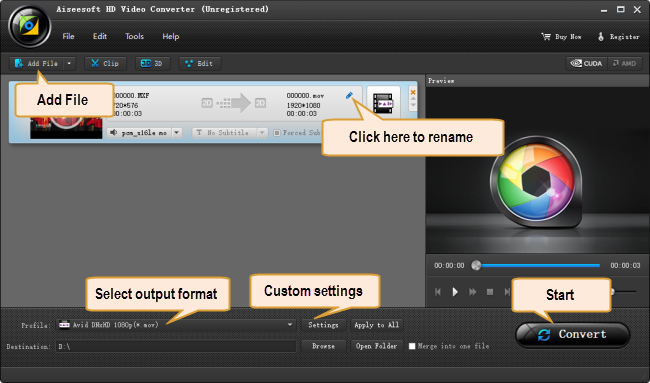
When the video clips are loaded, you can click the small ‘edit’ icon to rename.
Step 2: Select output format for Premiere
If you are running Premiere Pro on a Windows PC, you can from ‘Profile’ bar, select ‘Avid DNxHD (*.mov)’ as output format under ‘Avid Media Composer’ column.
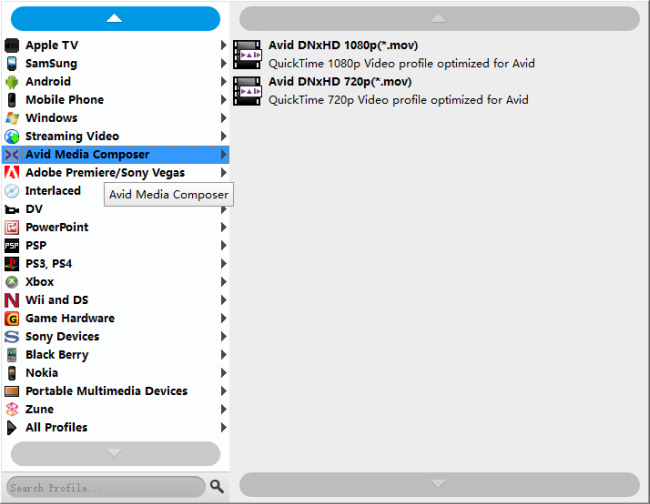
Important: If you’ve loaded a number of video clips to do batch conversion, please do remember ticking off ‘Apply to All’ option before you start.
If you are using Premiere Pro on a Mac, you can select ‘Apple ProRes 422 (*.mov)’ as output format under ‘Final Cut Pro’ column.

In addition to DNxHD and ProRes, you can also select ‘MOV (AVC) (*.mov)’ as output format under ‘Adobe Premiere/Sony Vegas’ option.
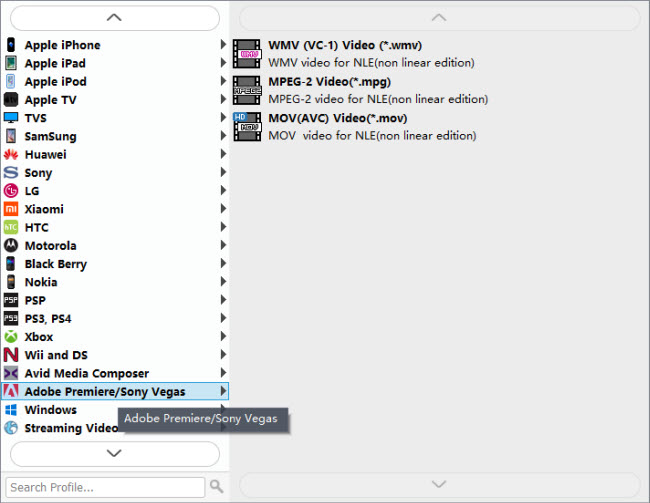
This method is also available when you want to edit XDCAM EX/HD video files in After Effects and Sony Vegas.
Step 3: Custom video and audio settings
If necessary, you can click ‘Settings’ button and go to ‘Profiles Settings’ panel to modify video and audio settings like video encoder, resolution, video bit rate, frame rate, aspect ratio, audio encoder, sample rate, audio bit rate, and audio channels. 3D settings are also available.
Step 4: Start XDCAM EX/H2 files to MOV Conversion
When ready, click ‘Convert’ to start format conversion. As soon as the conversion is complete, you can click ‘Open Folder’ button to get the renamed files for use in Adobe Premiere with optimum performance.
Related posts
How to import AG-DVX200 4K MP4/MOV to Premiere/Vegas?
Panasonic AJ-PX5000 AVC-ULTRA to Avid, Premiere, Vegas
How to import Panasonic AG-HPX171 P2 MXF to Premiere Pro?
Bring/import Sony TD30V 3D AVCHD into Avid, Premiere, Vegas