Summary: If FCP X refused reading P2 media files because you did not copy the whole structure, you may be interested in this post. It introduces a useful software program that is able to help you getting usable MXF media out of a somehow defective P2 card.
User Question: “Can anyone help me with not being able to import P2 media files from my external hard drive into FCP X? I did something to the file structure in the copy to HD process then both FCP X and Panasonic P2 Viewer would not mount the Card. The structure seemed the same however I think I moved the last Text file and could not get it back. Any help in words of one syllable appreciated.”
Keep in mind that P2 media need to retain their folder structure to be recognized by FCP X. Otherwise, you can not expect FCP X to read MXF clips on a P2 card. If you have already lost some file in the backup process, Video Converter for Mac will fix that. From Video Converter for Mac you could mount the P2 MXF files you copied to your HD, and transcode P2 MXF to Apple ProRes for editing within FCP X.
Try out Video Converter for Mac

The Video Converter for Mac, which works great as a P2 MXF Video Converter for Mac, is a converter program designed for transcoding HD media, including camera and camcorder videos files to whatever format you need with best video and audio synchronization. It supported camera brands include Canon, Sony, JVC, Nikon, Panasonic, Fujifilm, Pentax, Red, Blackmagic, Sanyo, and so on. With this little tool, you are able to create editable files for NLEs like FCP X, FCP 6/7, iMovie, Final Cut Express, Avid MC, DaVinci Resolve, Premiere Pro CS 6, Sony Vegas, etc. and export playable files for iOS devices, Android devices, HD Media Players, Game consoles and more.
Read before try: Why there’s no sound in P2 MXF files?
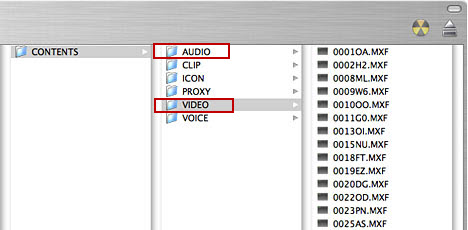
As the image shows below, the P2 card stores video and audio files in separate folders, if you dig into the ‘Video’ folder and copy loose .MXF files only without backing up the entire MXF file structure as it saved on your camcorder’s P2 card, your files will have image only with sound lost. That’s to say, whenever you copy footage on a P2 card, be sure you copy everything as it saved on your camcorder’s P2 card.
What to do if FCP X does not mount/recognise your P2 MXF media files?
Assuming you did not copy the whole P2 structure so FCPX can’t “see” them, you could try to rewrap them to QuickTime ProRes using Video Converter for Mac. To do format conversion, follow these steps:
Step 1: Install and run Video Converter for Mac as the best P2 MXF Video Converter for Mac. As soon as the main interface pops up, click ‘Add File’ button to load source video files.

Step 2: Select output format for FCP X
In order to convert P2 MXF media files to Apple ProRes for FCP X or the former version FCP 6 and 7, from the Format bar, navigate to ‘Final Cut Pro’ catalogue, and select ‘Apple ProRes 422 (*.mov)’ as target format. Apple ProRes is the best suited editing codec for FCP X and FCP 6/7, so when loading them into FCP, you needn’t wait for a long time for the rendering process.

Important: If you’ve loaded a number of video clips to do batch conversion, please do remember ticking off ‘Apply to All’ option before you start.
Step 3: Custom video and audio settings (for advanced users)
Click ‘Settings’ button, the ‘Profile Settings’ window pops up, on which you are allowed to custom video and audio parameters like bit rate, frame rate, resolution, sample rate, and audio channels.
Step 4: Start transcoding P2 MXF shootings to ProRes 422
When ready, click ‘Convert’ button to convert P2 MXF media files to Apple ProRes for editing with FCP X.
Tips: if you don’t want to wait around in front of your computer for the converting process, you can tick off ‘Showdown computer when conversion completed’ and go away to do other things.
Step 5: Click ‘Open Folder’ button to get the generated ProRes QuickTime files
When the conversion is finished, simply click ‘Open Folder’ button to get the exported ProRes files for using in Final Cut Pro X with optimum performance.
Also read
Panasonic Lumix FZ1000 workflow with Final Cut Pro X
I could not import Sony A7S XAVC S or AVCHD files to FCP X
How can I edit Canon EOS 750D/Rebel T6i H.264 MOV in FCP X?