Need help with Sony BPAV and DaVinci Resolve workflow? If so, you may have interest in this post. It elaborates the detailed steps required to convert Sony BPAV MP4 footage to ProRes .mov or DNxHD .mov for use in DaVinci Resolve by using third party converter program.
Needed to rewrap Sony BPAV MP4 files for DaVinci Resolve
“Hi, there, somebody provided me a BPAV of a remote shoot, and to cut a long story short, the structure didn’t make the translation, and trying to download individual elements was becoming a nightmare. The biggest problem is DaVinci Resolve will not open the .MP4 files from the BPAV folder. Is there any other way of rewrapping XDCAM EX BPAV .mp4 files to DaVinci Resolve supported .mov similarly to the way XDCAM Transfer does, but without needing the folder structure? Any ideas??? I would appreciate any and all help. Thanks.”
To be able to work with BPAV files in DaVinci Resolve smoothly, you should not change the name of the BPAV folder and you should never change any of its contents – doing either will lead to all kinds of problems.
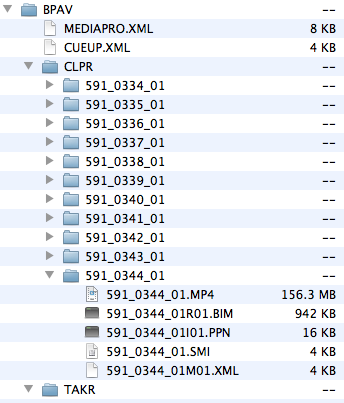
Anatomy of a BPAV folder used by XDCAM EX
If for whatever reason you have screwed up BPAV folders on a DaVinci Resolve project, or you having issues working with BPAV files in Resolve, we intend to advise converting BPAV MP4 files to a format that is edit friendly for use in Resolve. The short tutorial below will walk you through the way to easily fix the situation.
Software requirement
HD Video Converter


[Guide] How to encode BPAV MP4 files for DaVinci Resolve editing?
Download and install HD Video Converter, then follow these steps:
Step 1: Run HD Video Converter as a professional BPAV MP4 to DaVinci Resolve Converter. When its main interface comes up, click ‘Add File’ to load source video to it.
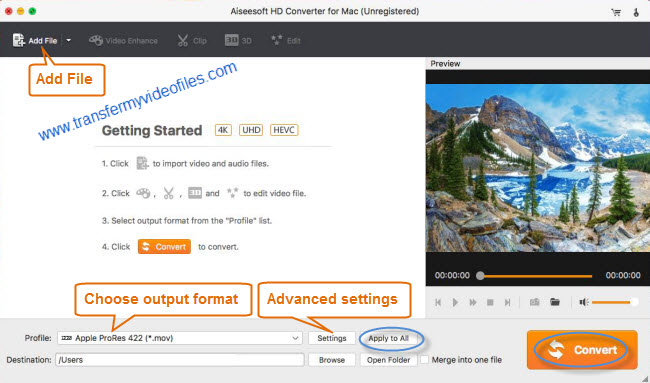
Step 2: Select output format for DaVinci Resolve
1) Convert BPAV MP4 to ProRes for Resolve
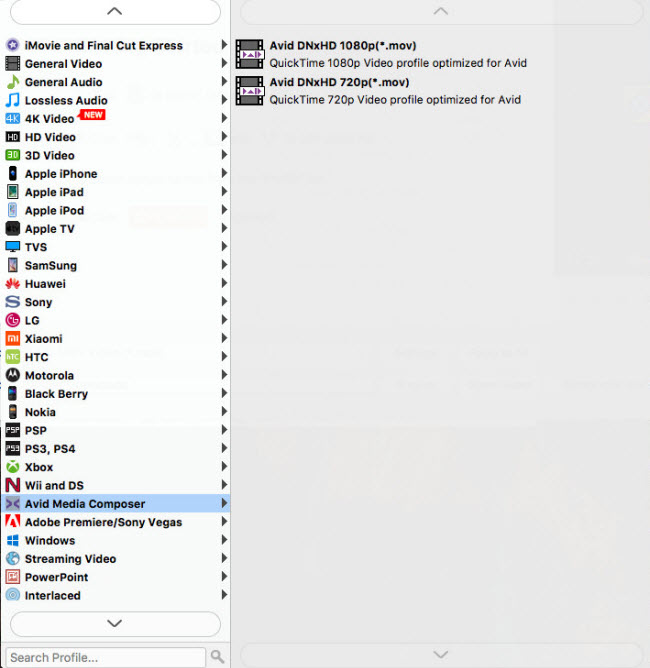
From ‘Profile’ list, move to ‘Final Cut Pro’ catalogue, and select ‘Apple ProRes 422 (*.mov)’ as target format.

Note that the ProRes output is only valid in the Mac version of HD Video Converter.
2) Transcode BPAV MP4 to DNxHD for DaVinci Resolve
From ‘Profile’ list, select ‘Avid DNxHD (*.mov)’ as output format under ‘Avid Media Composer’ column.
Important: If you’ve loaded a number of video clips to do batch conversion, please do remember ticking off ‘Apply to All’ option before you start.
Step 3: Adjust video and audio settings (for advanced users)
If necessary, you can click ‘Settings’ button and go to ‘Profiles Settings’ panel to modify video and audio settings like video encoder, resolution, video bit rate, frame rate, aspect ratio, audio encoder, sample rate, audio bit rate, and audio channels. 3D settings are also available.
Step 4: Click ‘Convert’ to start BPAV MP4 files to ProRes/DNxHD conversion.
Step 5: Click ‘Open Folder’ to get generated ProRes/DNxHD QuickTime files for use in DaVinci Resolve with optimum performance.
Related posts
Trouble working with MXF files in DaVinci Resolve
Sony PXW-Z100 4K XAVC to FCP and DaVinci Resolve
How to import and edit AVCHD footage within DaVinci Resolve?
DaVinci Resolve workflow with Sony F55/F5 XAVC MXF footage