How can I get DaVinci Resolve to see the MXF files shot on a Panasonic P2 camera? If you are having troubles when working MXF files with DaVinci Resolve, you may find a solution here in this post. It displays how to transcode MXF to Apple ProRes for using in DaVinci Resolve and have it saw the audio.

“Hey, guys, I am trying to import MXF footage shot on a Panasonic AG-HPX370 P2 HD Camcorder into DaVinci Resolve. When prompted I pointed to the video folder, I could see and load the MXF clips, but there was no audio attached. My question is, how can I import P2 footage into DaVinci Resolve with audio files preserved?”
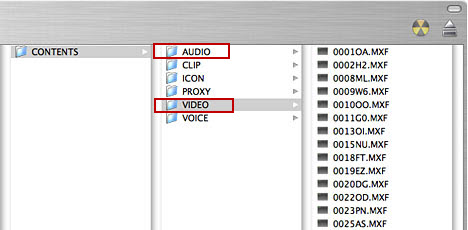
If you are a P2 camcorder user, you must be familiar with the P2 file structure. Unlike Canon XF card stores video and audio files together in the same folder, the P2 stores video files in ‘VIDEO’ folder and audio files in ‘AUDIO’ folder separately. That’s why people sometimes have audio files lost when handling P2 videos. See P2 structure below:
To make things easier, we would recommend using third party software like Video Converter for Mac to transcode MXF to ProRes for using in DaVinci Resolve. This guide below displays how to do this.
Download a free trial of Video Converter for Mac

MXF workflow with DaVinci Resolve – transcode MXF to Apple ProRes for DaVinci Resolve
To be able to convert P2 MXF for DaVinci Resolve using Video Converter for Mac, follow these steps:
Step 1: Run Video Converter for Mac as a professional MXF to DaVinci Resolve Converter. When the main interface pops up, you can click ‘Add File’ button to load P2 MXF media into this program.

Step 2: Click “Profile” menu to choose ‘Apple ProRes 422 (*.mov)’ as output format under ‘Final Cut Pro’ column. The ProRes 422 is a good option for the .MXF files, and the file size is reasonable.

Important: If you’ve loaded a number of video clips to do batch conversion, please do remember ticking off ‘Apply to All’ option before you start.
Step 3: Click “Settings” button to custom video and audio parameters on ‘Profile Settings’ panel. (Optional)
Step 4: Click ‘Convert’ button to start converting P2 MXF video to Apple ProRes 422 for using with DaVinci Resolve.
Step 5: After conversion finished, click “Open Folder” button to get the exported ProRes 422 QuickTime files for using in DaVinci Resolve.
Also read
Why Adobe Premiere Pro CS6 can’t import MXF video files?
How can I import MXF footage into Avid Media Composer?
FCP 7 not recognizing my MXF file – convert MXF to ProRes
Convert P2 MXF to ProRes for FCP 6/7/X without losing sound
MXF and Vegas – How can I edit MXF video files in Sony Vegas?