Summary: Are you still working with Final Cut Express? If you are editing with the discontinued Final Cut Express, you may have troubles while importing footage created by a new released camcorder like Panasonic HC-V750. This guide describes the best workflow for FCE and Panasonic HC-V750 by transcoding HC-V750 AVCHD/MP4 to AIC for using in FCE.

As a video editing software suite created by Apple, Final Cut Express did a good job in advanced editing of digital video as well as high-definition video, which was used by lots of video editing amateur and professional videographers. Unfortunately, as of June 21, 2011, with the release of Apple’s Final Cut Pro X, Final Cut Express came to its end.
Assuming that you are still editing with Final Cut Express, but shooting with a New released camera like Panasonic HC-V750, you may find it is problematic to import HC-V750 AVCHD/iFrame MP4 to FCE for advanced editing. In that case, you will need to convert Panasonic AVCHD to a format that is best friendly with FCE, such as Apple’s InterMediateCodec (AIC). This requires third party software. Considering the ease of use and optimum output files that best suited for FCE, Video Converter for Mac is recommended. You can download a free trial to see if it works as you expected.
Download a free trial of Video Converter for Mac

FCE and Panasonic HC-V750 workflow – transcode HC-V750 AVCHD/iFrame MP4 to AIC for FCE
To convert Panasonic HC-V750 AVCHD MTS/iFrame MP4 files for editing with Final Cut Express, follow these steps:
Step 1: Run HD Video Converter for Mac as a Panasonic HC-V750 Video Converter for Mac. When the main interface comes up, click ‘Add File’ button to import MTS/MP4 clips captured by a Panasonic HC-V750. You can load directly from a camera or from a card reader, or from a folder on your HDD that contains your media data.

Step 2: Select output format for Final Cut Express
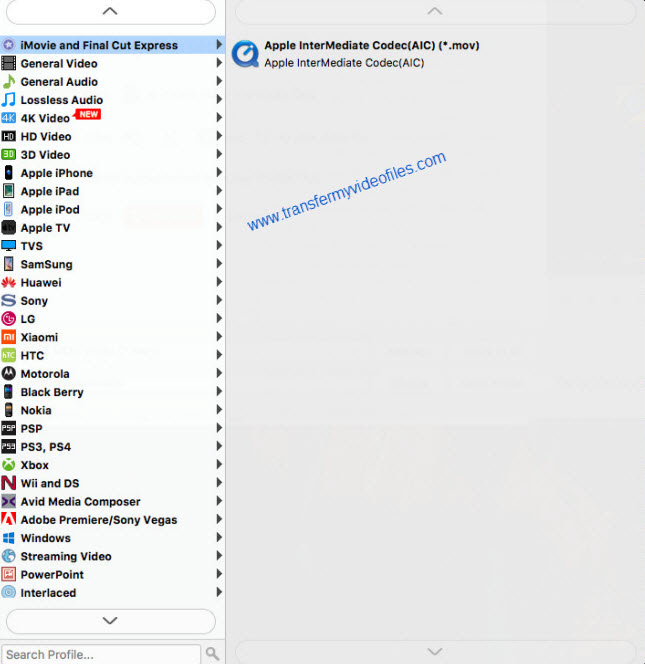
In order to edit Panasonic HC-V750 shootings in FCE, from the Format bar, choose ‘Apple InterMediateCodec (AIC) (*.mov) as output format from ‘iMovie and Final Cut Express’ catalogue.

Important: If you’ve loaded a number of video clips to do batch conversion, please do remember ticking off ‘Apply to All’ option before you start.
Tips:
1. The AIC files are best fitted for using in iMovie as well.
2. The Panasonic HC-V750 Video Converter for Mac is also able to generate Apple ProRes files for editing with Final Cut Pro.
Step 3: Custom video and audio settings (for advanced user)
If you want to adjust video and audio settings in your own way, you can click ‘Settings’ button and go to ‘Profile Settings’ panel to do so, if not, simply skip this step.
Step 4: When ready, click the ‘Convert’ button to start converting HC-V750 video files to AIC for using within Final Cut Express.
Tips: You can tick off ‘
Showdown computer when conversion completed’ checkbox, and go away to do other things instead of waiting around in front of the computer for the entire conversion process.
Step 5: When the conversion finished, click ‘Open Folder’ button to find the generated QuickTime AIC MOV files for using in Final Cut Express.
Also read
Convert Panasonic HC-V550CT AVCHD/MP4 to iMovie, FCP and Avid
Convert HC-W850 recordings to QuickTime for iMovie, FCP and Avid
Convert P2 MXF to ProRes 422 for FCP 6/7/X without losing sound
