Should you convert DSLR H.264 footage to ProRes for editing? This post will show you an easy and direct way to transcode DSLR H.264 footage to ProRes codec for working with NLE apps like FCP X, FCP 6/7, After Effects, Adobe Premiere, and DaVinci Resolve.
Why convert raw DSLR footage from h.264 to ProRes before they go into post?
H.264 is a consumer capture and delivery codec, which is fantastic for capturing and delivering content to consumer devices but it’s not a codec very suitable for editing. The H. 264 is highly compressed that requires a fair amount processing power to decode. This is processing power you are taking away from your NLE app. Add 3 or 4 clips at a time on your timeline and things start to crawl. That’s the biggest reason for converting DSLR H.264 footage to ProRes before you start editing them in NLEs like FCP (X), After Effects, Adobe Premiere, and DaVinci Resolve.
The next reason for transcoding DSLR raw H.264 footage to ProRes is grading. While the source is heavily compressed, working with an edit friendly 10bit file, even derived from 8bit source, is a lot easier than dealing with a compressed H.264 file.
Over the last few years machines have become more powerful and NLEs have become more efficient but there are still benefits of working with an edit friendly codec. Read on to find the detailed steps required to encode DSLR files from H.264 to ProRes using third party software called HD Video Converter for Mac.
Download a trial version of HD Video Converter for Mac

More than working as an H.264 to ProRes Converter for Mac, this app can also convert H.264 footage as well as camera footage in format of AVCHD MTS, MXF, XAVC, XAVC S, XDCAM, XDCAM HD, XDCAM EX, DV AVI, etc. to edit friendly codecs like Apple ProRes, Avid DNxHD, Apple InterMediate Codec (AIC), DVCPRO, HDV, DV, QuickTime Movie Format and more.
[Guide] – How to convert DLSR H.264 clips to ProRes for editing?
Follow these steps:
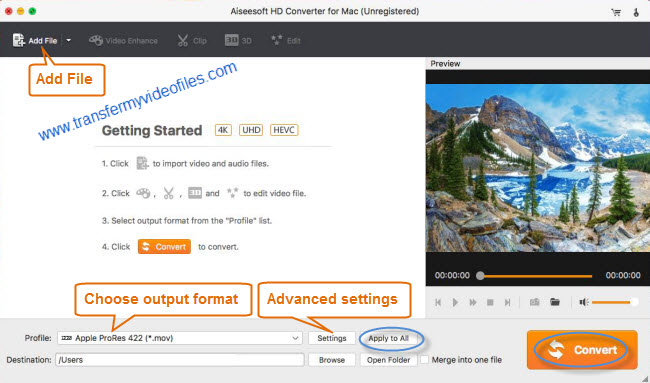
Step 1: Run HD Video Converter for Mac as a professional H.264 to ProRes Converter. When its main interface comes up, click ‘Add File’ to load source video to it.

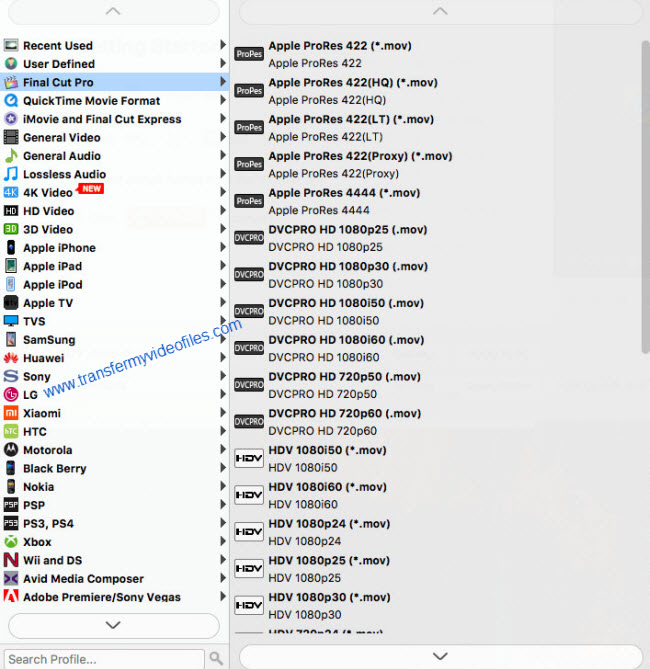
Step 2: Select ‘Apple ProRes (*.mov)’ as output format for opening with NLEs
From the Format bar, move to ‘Final Cut Pro’ catalogue, and select one of the five ‘Apple ProRes (*.mov)’ options as target format.
This DSLR H.264 footage to ProRes converter offers a couple of ProRes formats for users to choose from, including Apple ProRes 422, Apple ProRes 422 (HQ), Apple ProRes 422 (LT), Apple ProRes 422 (Proxy), and Apple ProRes 4444, you can select one as target format depending on your requirement in post production.
Apple ProRes 422 – Higher quality than Apple ProRes 422 (LT);
Apple ProRes 422 (HQ) – Keep original video quality for editing in FCP;
Apple ProRes 422 (LT) – Get a smaller file sizes than Apple ProRes 422;
Apple ProRes 422 (Proxy) – SD levels – 480i/p and 576i/p. Used in offline workflows.
Apple ProRes 4444 – Edit and finish 4:4:4 material.

Important: If you’ve loaded a number of video clips to do batch conversion, please do remember ticking off ‘Apply to All’ option before you start.
Step 3: Adjust video and audio settings (for advanced users)
If necessary, you can click ‘Settings’ button and go to ‘Profiles Settings’ panel to modify video and audio settings like video encoder, resolution, video bit rate, frame rate, aspect ratio, audio encoder, sample rate, audio bit rate, and audio channels. 3D settings are also available.
Step 4: Click ‘Convert’ to start H.264 to ProRes conversion.
Step 5: Click ‘Open Folder’ to get generated ProRes QuickTime files for transferring and editing in NLEs like FCP, After Effects, Adobe Premiere and Davinci Resolve with optimum performance.
Related posts
AVCHD to After Effects ProRes-MTS to AE ProRes Conversion
What’s the best Panasonic AVCHD MTS Converter for Mac?
Canon MXF to ProRes Converter | Canon MXF to FCP converter
XAVC(S) & DaVinci Resolve–convert XAVC(S) to MOV for Resolve
