Could not figure out the correct workflow between MXF files and After Effects? No worry, this article explores the best workaround to import MXF to After Effects by accessing format transcoding.

MXF is a container format. After Effects can only import some kinds of data contained within MXF files. If your source MXF files are not AE supported ones, After Effects will refuse accepting them or crash unexpectedly. What to do if After Effects doesn’t have native support for your MXF files? In this case, you will need to transcode MXF footage to an intermediate codec that After Effects accepts well, such as QuickTime MOV. To process format shifting, third party software like HD Video Converter is required. This converter program features easy-to-use and intuitive interface, even if you are a new user, you can quickly master the basic steps. The most important thing is that it features optimal format preset for After Effects, which ensures optimum performance when you editing re-encoded MXF files in After Effects.
Download a free trial of HD Video Converter


MXF to After Effects workflow – how to import MXF to AE?
As we mentioned above, to be able to make MXF files work smoothly with AE, you will need to convert MXF files to QuickTime MOV for After Effects using HD Video Converter. To do format conversion, follow these steps:
Step 1: Start up HD Video Converter as a professional MXF to After Effects Converter. Click ‘Add Video’ to import your source media to the program.
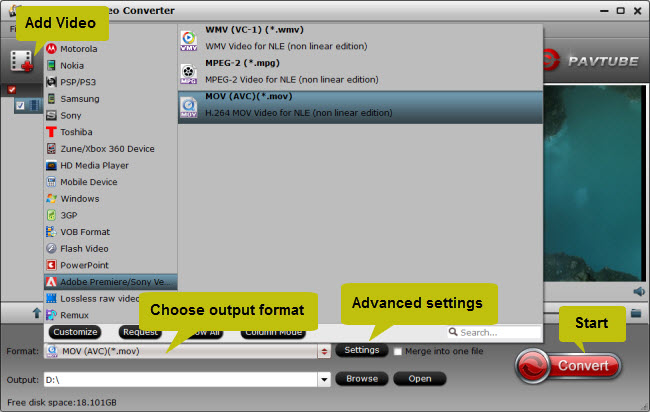
Step 2: Select output format
Click the drop-down list besides ‘Format’, choose ‘Adobe Premiere/Sony Vegas > MOV (AVC)(*.mov)’ as the most compatible format for After Effects with best quality. You can choose ‘MPEG-2 (*.mpg)’, or ‘WMV (VC-1) (*.wmv)’ as well.
Also, if you are on a Windows PC, you can from the format bar, choose ‘Avid DNxHD 1080p (*.mov)’ as output under ‘Avid Media Composer’ column. And If you are on a Mac computer, and already have FCP installed on your computer, you can choose ‘Apple ProRes 422 (*.mov)’ as target under ‘Final Cut Pro’ catalogue. This method is also available when you want to edit MXF files in Adobe Premiere Pro.
Step 3: Custom video and audio settings (for advanced users)
Click ‘Settings’ button, the ‘Profile Settings’ panel pops up, on which you are able to modify video and audio settings like resolution, bit rate, frame rate, sample rate and audio channel.
Step 4: When ready, click ‘Convert’ to start transcoding MXF files to After Effects supported QuickTime MOV format. As soon as the conversion complete, click ‘Open’ button to locate the generated files and now you are able to open them in AE for further editing.
Also read
How can I import Canon C300 MXF to FCP 6/7/X?
Import MXF footage into Avid Media Composer
How to import Sony F55/F5 CineAlta 4K XAVC to FCP?
How to import and edit AVCHD within DaVinci Resolve?