Summary: If XAVC footage taken with a Sony PMW-F55 or F5 crashed After Effects CS6, what to do? In this post, we are going to explain the best workaround to make Sony XAVC MXF file compatible with Adobe After Effects CS6.
“I’m wondering if anyone can help. Trying to get XAVC (MXF) footage from a Sony PMW-F55 to work in After Effects CS6 (Mac). But every time when I try to do anything with it, it crashes. I have reinstalled AE about 5 times now, cleared caches, reset preferences, etc. and have no results. I have been having this problem for weeks now with no resolve from Adobe what so ever. I agree that the XAVC looks stunning, but it’s a pain to edit Sony XAVC in AE. Not sure what else to do here other than transcoding XAVC to QuickTime or anything that would work with AE CS6. Anyone who has successfully filmed with the Sony F55 or F5 and transcoded the native XAVC files to MOV, please kindly tell me how you did it. Many thanks in advance.”
You may probably in the same situation as mentioned above. In that case, we would recommend that you use HD Video Converter for Mac to convert F55/F5 XAVC MXF files to MOV for use in After Effects CS6. The HD Video Converter program comes in both Windows version and Mac version, and works excellently as a Sony XAVC to After Effects Converter.
Download a free trial of HD Video Converter


Sony XAVC and After Effects workflow – convert XAVC MXF files to QuickTime MOV for After Effects
As we mentioned above, to be able to make Sony XAVC MXF files work smoothly with AE, you will need to convert F55/F5 XAVC files to QuickTime MOV for After Effects using HD Video Converter. To do format conversion, follow these steps:
Step 1: Start up HD Video Converter as a professional XAVC to After Effects Converter. Click ‘Add File’ to import your source media to the program.
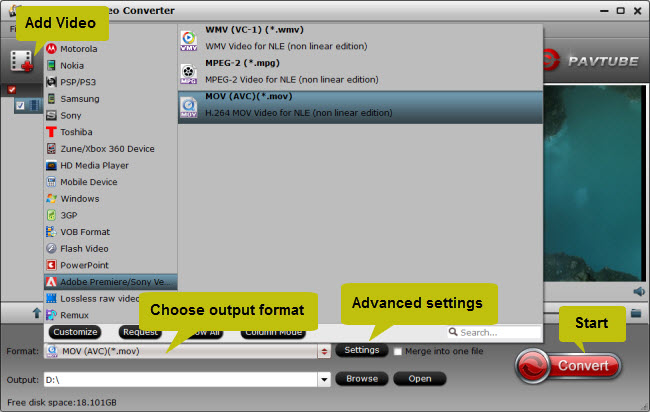
Step 2: Select output format for AE
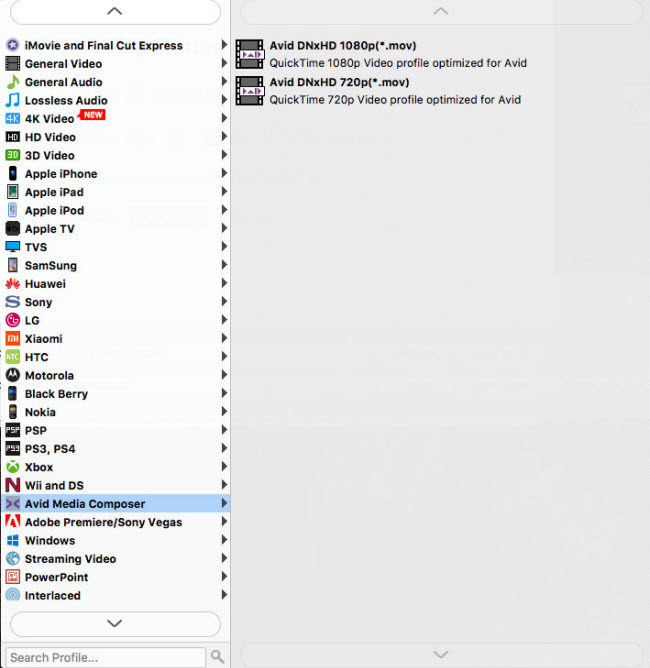
If you are on a Windows PC, you can from the format bar, choose ‘Avid DNxHD 1080p (*.mov)’ as output under ‘Avid Media Composer’ column.
And If you are on a Mac computer, and already have FCP installed on your computer, you can choose ‘Apple ProRes 422 (*.mov)’ as target under ‘Final Cut Pro’ catalogue. This method is also available when you want to edit XAVC MXF files in Adobe Premiere Pro.

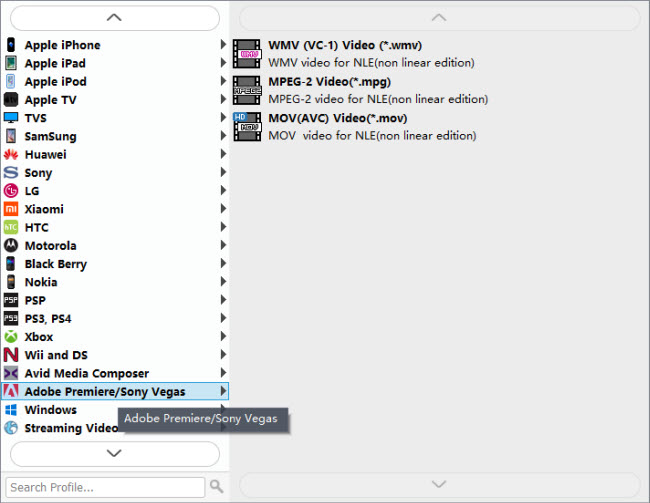
Also, you can click the drop-down list besides ‘Profile’, choose ‘Adobe Premiere/Sony Vegas > MOV (AVC)(*.mov)’ as the most compatible format for After Effects with best quality. You can choose ‘MPEG-2 (*.mpg)’, or ‘WMV (VC-1) (*.wmv)’ as well.
Step 3: Custom video and audio settings (for advanced users)
Click ‘Settings’ button, the ‘Profile Settings’ panel pops up, on which you are able to modify video and audio settings like resolution, bit rate, frame rate, sample rate and audio channel.
Step 4: When ready, click ‘Convert’ to start transcoding XAVC files to After Effects supported QuickTime MOV format. As soon as the conversion is complete, click ‘Open Folder’ button to locate the generated files and now you are able to open them in AE for further editing.
Related posts
How to import Sony F55/F5 CineAlta 4K XAVC to FCP?
MXF to After Effects workflow – how to import MXF to AE?
Can iMovie/FCE natively handle Sony F55/F5 XAVC footage?
Open and edit Sony PMW-F55/F5 XAVC HD and 4K XAVC in Avid