If you are looking for a fast and fluid JVC SP100 4K workflow with Adobe Premiere, you may wish to read this post. It displays a way of transcoding JVC SP100 4K footage to DNxHD/ProRes .mov for editing in Premiere with pristine quality.
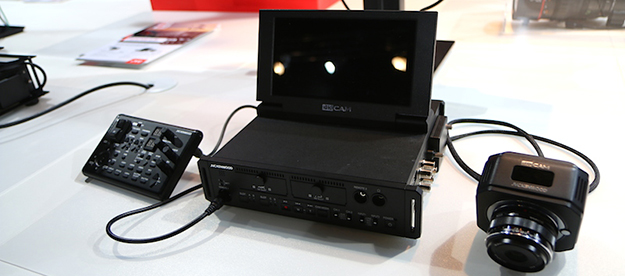
The JVC GW-SP100 is a 4KCAM remote camera head and recording unit. The SP100 system includes the camera head, a recording/playback device with built-in monitor and a RCU controller. This tiny camera records at 4K Ultra HD and HD at 4:2:2 150Mbps, and supports up to 50/60p recording in both HD and 4K. 4K footage is recorded as a single file in AVC H.264 format at 150Mbps. If for some reason you are getting into a trouble editing JVC SP100 AVCHD / AVC H.264 / MPEG-4 in Premiere Pro, you may need to process “transcoded editing” using third party software like HD Video Converter for Mac. Read on to find a step-by-step guide talking about how to convert JVC SP100 4K H.264/AVCHD footage for Premiere editing.
Software requirement
HD Video Converter
By using this Video Converter program, you are able to convert JVC SP100 AVCHD / 4K AVC H.264 / MPEG-4 footage to whatever format you need for editing and playing. It comes with very easy to use menus and produces very good quality DNxHD/ProRes conversions as well as bulk processing so you could load it with files and leave it alone to do the job.
Download a demo of HD Video Converter


Low price is not the only angle to measure a good Video Converter program, conversion speed and output quality weigh the same. This Video Converter app promises you fast conversion speed and output files with excellent quality without audio & video out of sync issues.
JVC SP100 4K and Premiere Workflow – how to convert JVC SP100 4K clips to MOV for editing in Premiere?
Follow these steps:
Step 1: Start up HD Video Converter as a JVC SP100 4K Converter for Premiere Pro. When its main interface pops up, click ‘Add File’ to input your source media.

Step 2: Choose output format for Premiere Pro
1) Convert JVC SP100 video to DNxHD .mov for Premiere
If you are running Premiere Pro on a Windows PC, you can from ‘Format’ bar, select ‘Avid DNxHD (*.mov)’ as output format under ‘Avid Media Composer’ column.
2) Transcode JVC SP100 4K to ProRes MOV for Premiere Pro
If you are using Premiere Pro on a Mac, you can select ‘Apple ProRes 422 (*.mov)’ as output format under ‘Final Cut Pro’ column.

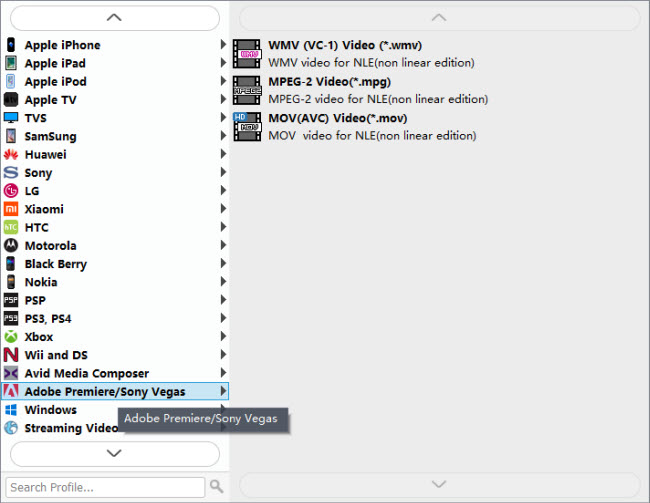
3) You can also select ‘MOV (AVC) (*.mov)’ as output format under ‘Adobe Premiere/Sony Vegas’ option.
Important: If you’ve loaded a number of video clips to do batch conversion, please do remember ticking off ‘Apply to All’ option before you start.
Step 3: Custom video and audio settings
If necessary, you can click ‘Settings’ button and go to ‘Profiles Settings’ panel to modify video and audio settings like video encoder, resolution, video bit rate, frame rate, aspect ratio, audio encoder, sample rate, audio bit rate, and audio channels. 3D settings are also available.
Step 4: Start JVC SP100 4K to MOV Conversion
When ready, click ‘Convert’ to start format conversion. As soon as the conversion is complete, you can click ‘Open Folder’ button to get the exported MOV files for use in Premiere Pro with optimum performance.
Related posts
Working with Sony EX1/EX3 XDCAM EX footage in Premiere Pro
How can I edit Nikon 1 J1/J4/S2/V3 MOV files in Premiere Pro?
How do I import Panasonic AG-HPX170 MXF files to Premiere?
What is the best workflow for GH4 AVCHD clips and Premiere?
How do I convert MXF files from C300 to edit in Adobe Premiere?