Summary: How do I convert my MXF video files from my Canon C300 to edit in Adobe Premiere Pro? If you are searching online for a solution to this question, you may in the right place. This post displays the detailed steps required to transcode C300 MXF footage to MOV for use in Premiere.
Is there a Canon C300 MXF to Premiere Pro Converter?
”Hi, there all, I’m a documentary maker/photographer/journalist working in the Arab world. I make short videos for NGOs like UNICEF. I live and work in the Middle East. Most of the videos I make are for online. Right now I need to convert the MXF files to edit in Premiere Pro CS6 from my new purchased Canon C300 camera. Is there a Canon C300 MXF to Premiere Pro Converter available that is able to encode C300 MXF footage to QuickTime format without losing much quality? I appreciate any suggestions. Many thanks.”
As a matter of fact, there are lots of MXF Converter programs out there, and our Video Converter is the one that can help you convert Canon C300 footage to MOV for editing in Premiere with lossless quality with no problem with the audio and video in sync.
Download a free trial of Video Converter


Video Converter MXF – Convert Canon C300 MXF for Premiere
Follow these steps:
Step 1: Start up Video Converter as a professional Canon MXF to Premiere Converter. Click ‘Add File’ to import your source media to the program.
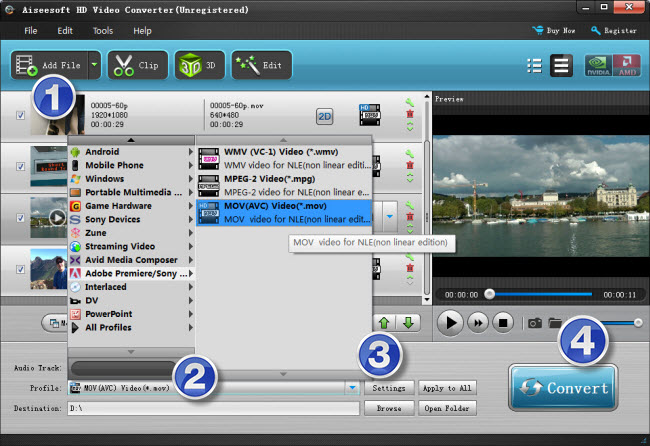
Step 2: Select output format
Click the drop-down list besides ‘Profile’, choose ‘Adobe Premiere/Sony Vegas > MOV (AVC)(*.mov)’ as the most compatible format for Premiere with best quality. You can choose ‘MPEG-2 (*.mpg)’, or ‘WMV (VC-1) (*.wmv)’ as well.
Also, if you are on a Windows PC, you can from the format bar, choose ‘Avid DNxHD 1080p (*.mov)’ as output under ‘Avid Media Composer’ column. And If you are on a Mac computer, you can choose ‘Apple ProRes 422 (*.mov)’ as target under ‘Final Cut Pro’ catalogue. This method is also available when you want to edit MXF files in Adobe After Effects.
Important: If you’ve loaded a number of video clips to do batch conversion, please do remember ticking off ‘Apply to All’ option before you start.
Step 3: Custom video and audio settings (for advanced users)
If necessary, you can click ‘Settings’ button and go to ‘Profiles Settings’ panel to modify video and audio settings like video encoder, resolution, video bit rate, frame rate, aspect ratio, audio encoder, sample rate, audio bit rate, and audio channels. 3D settings are also available.
Step 4: When ready, click ‘Convert’ to start transcoding Canon C300 MXF files to Premiere supported QuickTime MOV format. As soon as the conversion is complete, click ‘Open File’ button to locate the generated files and now you are able to open them in Premiere Pro for further editing.
Related posts
Why Adobe Premiere Pro CS6 can’t import MXF files?
Transcode Sony F55/F5 XAVC to QuickTime for After Effects
MXF to After Effects workflow – how to import MXF video to AE?
The best way to import Sony AVCHD files to Adobe Premiere Pro