Summary: This post introduces a reliable and effective Sony AVCHD Converter for After Effects to help you convert Sony AVCHD M2TS video to MOV for use in After Effects and Premiere Pro with lossless quality.
Asking for a program to convert Sony AVCHD video for use in After Effects
“Hi, guys, I’m wondering if you can help. I have a bunch of AVCHD M2TS videos recorded in Sony (I’m not sure the model) camera and I have to edit them in After Effects and Premiere. The video is a scribing animation to use for a commercial presentation next week. So I am very hurry and asking for a program to convert AVCHD video recorded with Sony camera for use in After Effects with lossless quality. Any recommendations? Thanks.”
Well, if you would like to transcode Sony M2TS clips for editing in After Effects or Premiere with lossless quality, you can give Video Converter a shot. This converter program comes in both Windows version and Mac version, enabling you to encode Sony AVCHD footage to H.264 MOV for use in After Effects with optimum quality and performance.
Download a free trial of Video Converter


How to lossless convert Sony AVCHD M2TS video for After Effects?
The steps:
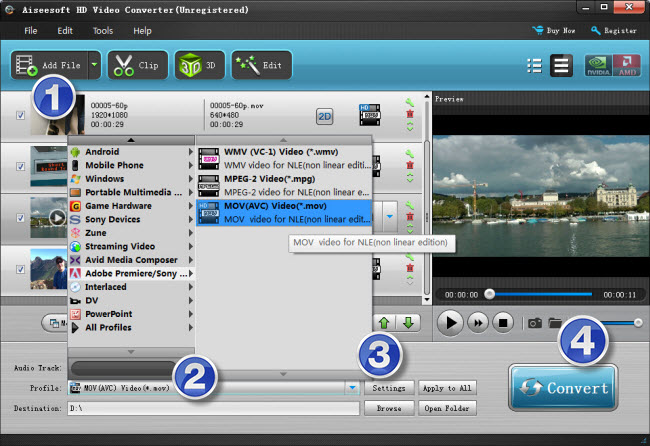
Step 1: Start up Video Converter as a professional Sony M2TS to After Effects Converter. Click ‘Add File’ to import your source media to the program.
Step 2: Select output format
Click the drop-down list besides ‘Profile’, choose ‘Adobe Premiere/Sony Vegas > MOV (AVC)(*.mov)’ as the most compatible format for After Effects with best quality. You can choose ‘MPEG-2 (*.mpg)’, or ‘WMV (VC-1) (*.wmv)’ as well.
Also, if you are on a Windows PC, you can from the format bar, choose ‘Avid DNxHD 1080p (*.mov)’ as output under ‘Avid Media Composer’ column. And If you are on a Mac computer, you can choose ‘Apple ProRes 422 (*.mov)’ as target under ‘Final Cut Pro’ catalogue. This method is also available when you want to edit AVCHD files in Adobe Premiere Pro.
Important: If you’ve loaded a number of video clips to do batch conversion, please do remember ticking off ‘Apply to All’ option before you start.
Step 3: Custom video and audio settings (for advanced users)
If necessary, you can click ‘Settings’ button and go to ‘Profiles Settings’ panel to modify video and audio settings like video encoder, resolution, video bit rate, frame rate, aspect ratio, audio encoder, sample rate, audio bit rate, and audio channels. 3D settings are also available.
Step 4: When ready, click ‘Convert’ to start transcoding Sony AVCHD files to After Effects supported QuickTime MOV format. As soon as the conversion is complete, click ‘Open File’ button to locate the generated files and now you are able to open them in AE for further editing.
Related posts
Transcode Sony F55/F5 XAVC to QuickTime for After Effects
MXF to After Effects workflow – how to import MXF video to AE?
The best way to import Sony AVCHD files to Adobe Premiere Pro
AVCHD 50p/60p to iMovie: does iMovie work with 50p/60p AVCHD?