We write this post to help those who are experiencing issues editing Sony a68 XAVC S video in Sony Movie Studio 13. It guides you through the process of converting Sony a68 XAVC S video to MPEG-2 files for use in Sony Movie Studio 13 with optimum performance.
How to work with Sony a68 XAVC S video in Movie Studio 13?
“Hi, everyone, I have a bundle of XAVC S (.mp4) footage shot on my new Sony a68 camera, which I want to use in Movie Studio 13. The problem is that Movie Studio 13 doesn’t support XAVC S video directly (I’m not using the Platinum version). So here comes my question, is there any workaround to make Sony a68 XAVC S video editable in Movie Studio 13? Please kindly suggest a solution. I would really appreciate any help. Thanks a lot.”
The higher bitrate compression of XAVC S means less quality loss due to compression and more information to work with in post when color correcting or manipulating the image. However, there wasn’t solid support for the XAVC S codec in the cheapest Movie Studio 13. To work Sony a68 XAVC S in Movie Studio 13 more efficiently, you’d better convert XAVC S to MPEG-2, Movie Studio 13’s most compatible format first. HD Video Converter is able to do the trick. Read on to learn a quick guide on how to encode Sony a68 XAVC S video for editing in Movie Studio 13 smoothly.
Here’s what you need
HD Video Converter


How to transcode Sony a68 XAVC S video to MPEG-2 for editing in Movie Studio with optimal quality?
The steps:
Step 1: Start up HD Video Converter as a professional Sony a68 XAVC S to Movie Studio Converter. Click ‘Add File’ to import your source media to the program.
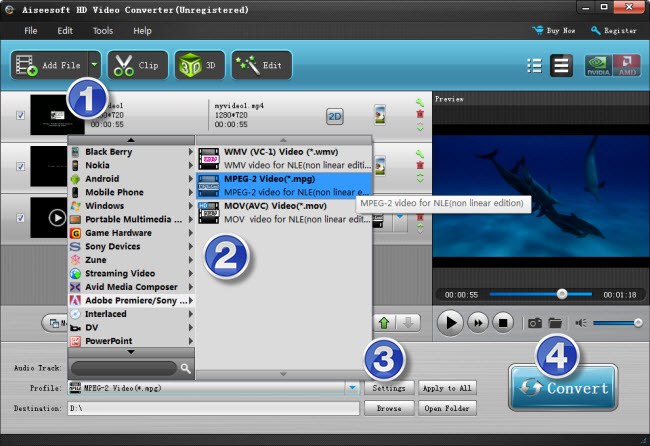
Step 2: Select output format
Click the drop-down list besides ‘Profile’, choose ‘Adobe Premiere/Sony Vegas > MPEG-2 Video (*.mov)’ as the most compatible format for Movie Studio with best quality.
Important: If you’ve loaded a number of video clips to do batch conversion, please do remember ticking off ‘Apply to All’ option before you start.
Step 3: Custom video and audio settings (for advanced users)
If necessary, you can click ‘Settings’ button and go to ‘Profiles Settings’ panel to modify video and audio settings like video encoder, resolution, video bit rate, frame rate, aspect ratio, audio encoder, sample rate, audio bit rate, and audio channels. 3D settings are also available.
Step 4: When ready, click ‘Convert’ to start transcoding Sony a68 XAVC S video to Movie Studio supported MPEG-2 format. As soon as the conversion is complete, click ‘Open File’ button to locate the generated files and now you are able to open them in Movie Studio easily for further editing.
Related posts
How to import Sony a68 XAVC S .mp4 into iMovie?
Sony a68 XAVC S in FCPX-edit Sony a68 XAVC S in FCPX
How do I import Sony a68 XAVC S to Windows Movie Maker?
Import/edit Panasonic HC-VX870K 4K MP4 in Pinnacle Studio