How to use H.265/HEVC files in DaVinci Resolve? If you are having issues working with H.265/HEVC video in DaVinci Resolve, you may wish to read this post. It explains a workaround to transcode H.265/HEVC footage to DNxHD or ProRes for editing in DaVinci Resolve easily and smoothly.
Samsung’s announcement of NX1 and NX500 mirrorless cameras was a big piece of news for two major reasons: first of all, the two cameras offer 4K recording capability and secondly it uses H.265 High Efficiency Video Codec (HEVC). The camera specs looked good on paper, but it would be a hard way if you are trying to do editing with the H.265 encoded files. That’s because most major NLEs don’t offer full support for H.265/HEVC yet. There’s no support for HEVC/H.265 from Apple, Adobe, etc. currently.
To be able to edit H.265/HEVC footage fluidly in NLE systems, you will have to transcode them to a format that is best suited for your editing programs. In our previous posts, we have talked about how to encode H.265/HEVC video to for FCP X, and here in this post, we would like to continue talking about how to transcode H.265/HEVC files for use in DaVinci Resolve.
To process file conversion third party converter software is required. Considering the ease of use and pretty good output quality, we would recommend HD Video Converter, a universal video transcoder that is able to convert 4K, 2K, Full HD 1080p/1080i, HD 720p and SD video files in format of AVCHD, MTS, M2T, M2TS, TS, MXF, MKV, H.264, P2 MXF, AVI, MP4, WMV, MOV, M4V, etc. to any formats you request.
You can download a demo version (for both, PC and Mac) to have a try.


H.265/HEVC and Davinci Resolve workflow – how to convert H.265/HEVC video to Davinci Resolve editable format?
The steps:
Step 1: Start up HD Video Converter as an HEVC Converter for DaVinci Resolve. When its main interface pops up, click ‘Add File’ to input your source media.

Step 2: Choose output format for DaVinci Resolve
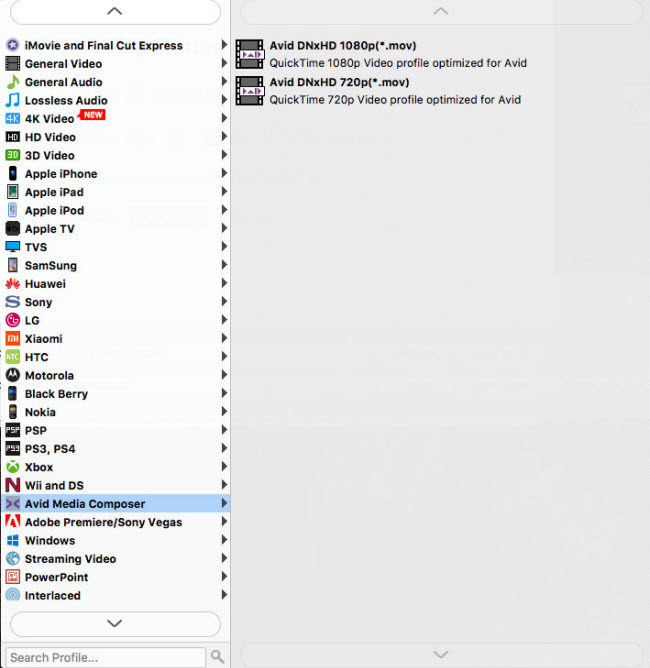
If you are running a Windows PC, we would recommend converting HEVC H.265 files to DNxHD for DaVinci Resolve, you can from ‘Profile’ bar, select ‘Avid DNxHD (*.mov)’ as output format under ‘Avid Media Composer’ column.
If you are running a Mac machine, we would recommend encoding H.265 HEVC files to ProRes 422 for DaVinci Resolve. You can choose ‘Final Cut Pro’ > ‘Apple ProRes 422 (*.mov)’ as target format.

Important: If you’ve loaded a number of video clips to do batch conversion, please do remember ticking off ‘Apply to All’ option before you start.
Step 3: Custom video and audio settings
If necessary, you can click ‘Settings’ button and go to ‘Profiles Settings’ panel to modify video and audio settings like video encoder, resolution, video bit rate, frame rate, aspect ratio, audio encoder, sample rate, audio bit rate, and audio channels. 3D settings are also available.
Step 4: Start HEVC H.265 files to DNxHD/ProRes MOV Conversion
When ready, click ‘Convert’ to start format conversion. As soon as the conversion is complete, you can click ‘Open Folder’ button to get the exported DNxHD/ProRes MOV files for use in DaVinci Resolve with optimum performance.
Related posts
Sony PXW-Z100 4K XAVC video to FCP and DaVinci Resolve
DaVinci Resolve workflow with Panasonic AG-HPX250 P2 MXF
How to import and edit AVCHD footage within DaVinci Resolve?
DaVinci Resolve workflow with Sony F55/F5 XAVC MXF footage
How to import Sony HDR-AS15 MP4 footage to DaVinci Resolve?