This post helps those who are having troubles working with Panasonic HC‑X1000 4K files in Edius. If you are looking for a smooth workflow for Panasonic HC‑X1000 4K and Edius, you may wish to read this post. It displays a workaround to transcode Panasonic HC‑X1000 4K video to DNxHD/ProRes for use in Edius flawlessly.

Panasonic HC‑X1000 is a mid-sized camera that feels compact. It weighs around three and a half pounds, making it easy to support during handheld shoots. Although it’s actually in Panasonic’s consumer line up, it bears a strong resemblance to the company’s professional products – and it operates just like you expect a pro camera to operate.
The Panasonic HC-X1000 has multiple 4K Ultra-HD recording formats and bit rates, including both 3,840 x 2,160-pixel and 4,096 x 2,160-pixel varieties. The highest-quality 4K recording is done at a bit rate of 150 Mbps (60 fps), and files can be saved in either MOV or MP4 format. There’s also a setting for 4K recording at 100 Mbps/30 fps. Regardless of how the file is saved, the HC-X1000 uses MPEG-4 encoding.
In addition to shooting at 4K resolution, the HC-X1000 can be set for HD (1,920 x 1,080 pixels), in which case it records in the AVCHD format at bit rates up to 28 Mbps. The camera uses a single 1/2.3-inch (approximately 0.43-inch) sensor.
Editing HD video from the HC-X1000 was not a problem on Edius, while sometimes editing HC-X1000 4K files in Edius is problematic. In our case, the Edius can handle 4K editing, but it did not like the 4k files from the Panasonic HC-X1000. To be able to get Edius to edit 4k files from HC-X1000, we would recommend transcoding HC-X1000 4K files to a format that is compatible with Edius first. Read on to check a quick guide on how to convert HC-X1000 4K files to Edius editable formats.
Here’s what you need
HD Video Converter


Panasonic HC-X1000 4K and Edius workflow – how to convert HC-X1000 4K files for editing in Edius?
Follow these steps:
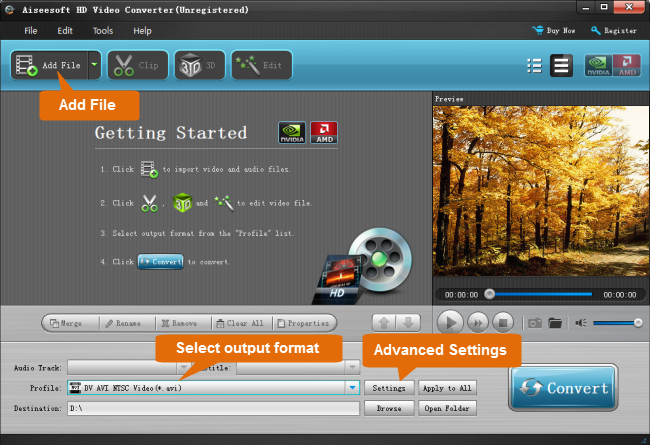
Step 1: Open up HD Video Converter as a professional HC-X1000 4K to EDIUS Converter. When its main interface pops up, click ‘Add File’ to import your source files.

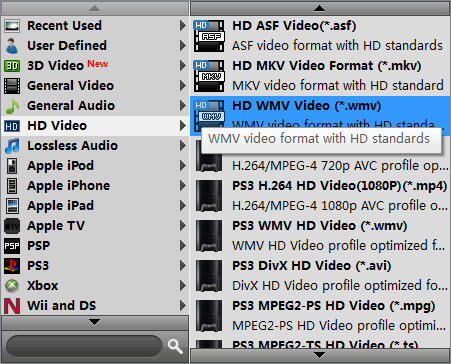
Step 2: Select output format for EDIUS
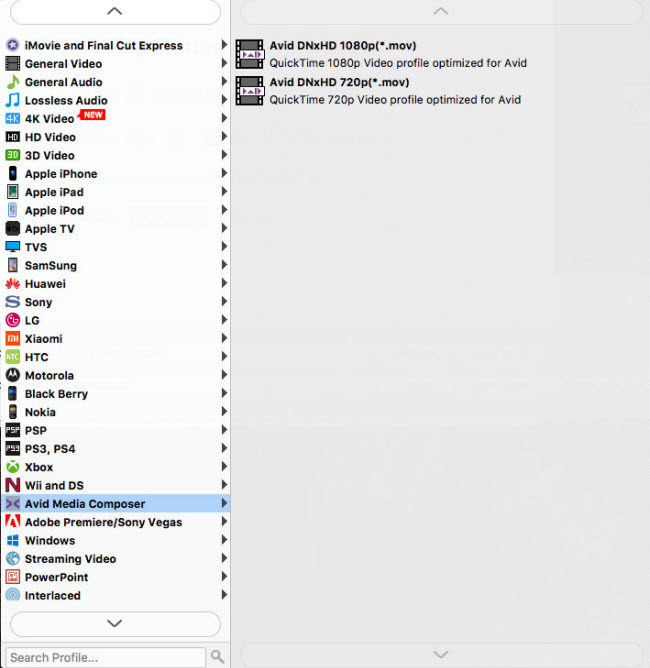
This converter provides a wide variety of formats as output. You can select a format that is natively supported by EDIUS as target, such as ‘WMV’ and ‘MOV’ under ‘HD Video’ column and ‘DNxHD .mov’ under ‘Avid Media Composer’ column. (The Mac version also provides ‘ProRes’ output under ‘Final Cut Pro’ column)
Convert HC-X1000 4Kfiles to HD WMV for EDIUS

Transcode HC-X1000 4K files to DNxHD .mov for EDIUS

Encode HC-X1000 4K files to ProRes .mov for EDIUS

Step 3: Modify video and audio settings
If necessary, you can click ‘Settings’ button and go to ‘Profiles Settings’ panel to modify video and audio settings like video encoder, resolution, video bit rate, frame rate, aspect ratio, audio encoder, sample rate, audio bit rate, and audio channels. 3D settings are also available.
Step 4: Start conversion
When ready, click ‘Convert’ to start file conversion. As soon as the conversion finished, you can click ‘Open Folder’ to get the exported files for working in EDIUS easily and directly.
If you don’t want to wait for the entire conversion process, you can tick off ‘Showdown computer when conversion completed’ and go away to do other things.
Related posts
AVCHD in Edius- how to import AVCHD MTS clips to Edius?
Getting XDCAM EX BPAV files from hard drive into Edius
XDCAM HD/EX and Edius workflow-edit XDCAM HD/EX in Edius
Import C300 Mark II 4K XF-AVC MXF movies to DaVinci Resolve
Panasonic GH4 and EDIUS workflow-import GH4 4K to EDIUS
