What’s the best Canon XF-AVC MXF and Windows Movie Maker workflow? If you are looking for an answer to this question, you may wish to read this post. It guides you through the process of converting XF-AVC MXF files to WMV for use in Windows Movie Maker with optimum performance.
In some cases, you will need to convert camcorder recordings from one format to another so that you can use them in your editing program fluidly. For a quick and smooth Canon XF-AVC workflow with Windows Movie Maker, you might need to convert XF-AVC MXF video to Windows Movie Maker format (e.g. WMV) before start. Depending on which file formats you’re converting, you might need to install additional software from Microsoft or other companies. Here in this post, we would like to display how to convert Canon XF-AVC MXF video to WMV for use in Windows Movie Maker with excellent quality via using third party software called HD Video Converter.
About HD Video Converter
As the name implies, the HD Video Converter is a reliable and powerful converter tool developed for the purpose of converting/transcoding High Definition and HD-camera/camcorder videos to whatever format you need, so that the produced files can be used in NLEs for further editing (e.g. Windows Movie Maker, Avid Media Composer, Sony Vegas, Adobe Premiere, FCP, iMovie, FCE, and DaVinci Resolve), or be viewed on popular devices like iPad mini 2, iPad Air, Samsung Galaxy Tab 4, Galaxy Note 4, Microsoft Surface Pro 3, Galaxy S5, Kindle Fire HDX, Google Nexus, WD TV, PS3, Xbox 360, and more for personal entertainment.
Download a free trial of HD Video Converter

How to get Windows Movie Maker to work with Canon XF-AVC MXF footage?
As we mentioned above, to be able to edit XF-AVC MXF footage in Windows Movie Maker, you will need to convert the footage to WMV before editing. To do format conversion, please follow these steps:
Step 1: Run HD Video Converter as a professional XF-AVC MXF Video Converter. Once the main interface comes up, click ‘Add File’ to import your camera media.
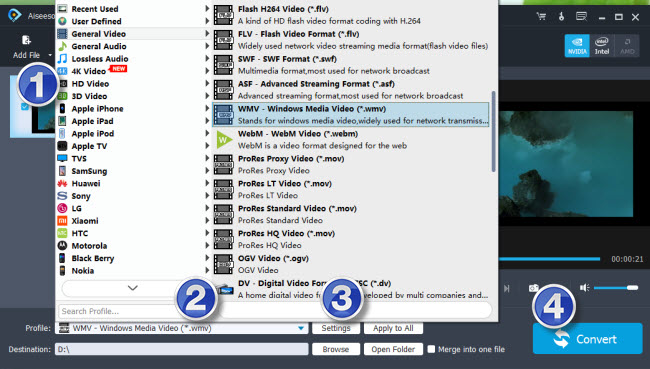
Step 2: Select output format for Windows Movie Maker
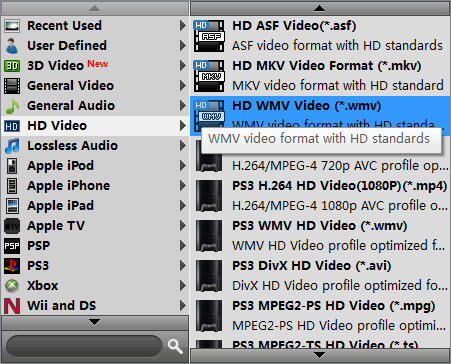
From ‘Profile’ list, choose ‘General Video’ > ‘WMV – Windows Media Video (*.wmv)’ as target format or choose ‘HD Video’ > ‘HD WMV Video (*.wmv)’ as output format.
Important: If you’ve loaded a number of video clips to do batch conversion, please do remember ticking off ‘Apply to All’ option before you start.
Step 3: Start Canon XF-AVC MXF files to WMV conversion
When ready, click ‘Convert’ button to start transcoding Canon XF-AVC MXF files to WMV for Window Movie Maker.
As soon as the conversion is complete, click ‘Open Folder’ button to get the generated WMV files for editing with Windows Movie Maker.
Also read
Import Nikon D810 60p MOV files to Windows Movie Maker
Convert Insignia H.264 AVI to WMV for Windows Movie Maker
How to import Olympus E-PL3 AVCHD to Windows Movie Maker?
Can I import Canon H.264 MOV footage into Windows Movie Maker?
Get Windows Movie Maker to work with Canon EOS 750D/Rebel T6i