If you are still unable to import Mavic Pro 2 HEVC-encoded files into Adobe Premiere Pro CC after installing the HEVC codec or upgrading, transcoding HEVC files becomes a highly recommended method, especially if your files are in 4K HEVC and you don’t have a high-end computer.
How do you edit Mavic Pro 2 H.265 Video in Premiere Pro 2018?
“I’m using Premiere Pro 2018 and just tried to import .MOV Dlog-m footage I shot with my Mavic Pro 2. At first I got an error message which said I didn’t have the proper codec for importing H.265 video. I converted the video to MP4 and dragged it into Premiere and it prompted me to download the H.265 codec plugin. I downloaded the plugin and was able to import the MP4 video. However, when I tried to import the other .MOV files, I still get the error message about not recognizing the codec. I guess I can always shoot in MP4 if I need to. I’m using OS 10.14.6. Upgrading Premiere Pro is not an option. Any thoughts?”
There is general confusion around video files between the wrapper used to contain the video, and the encoded video itself. It may not matter to you, but the post editors and the PC hardware does.
‘.mp4’ and ‘.mov’ are container formats. They can contain various video streams within them. These video streams can be compressed with different video codecs – h.264, h.265, avc, etc. Most NLE s read the containers fine, but differ greatly on their ability to handle the codec inside. Particularly with the h.265 codec, pc hardware makes a big difference. Older PCs struggle, with stuttering or dropped frames, or not playing at all being common.
DJI makes this somewhat more confusing by using their own variants of the codecs. Their “raw” format for still images is not a true raw image, but rather a TIFF embedded in something labeled as raw. I have not yet figured out exactly what is going on with the dlog footage, but have had limited success with it, even with a number of third party LUTS.
If for any reason you failed to work with Mavic Pro 2 H.265 HEVC Video in Premiere Pro, we would recommend transcode it first.
How to Transcode Mavic Pro 2 H.265 HEVC Video to Premiere Pro compatible codec?
In fact, HEVC is a non-performant format that is difficult to edit with and requires much computing power to process. Importing HEVC files into Premiere Pro is still a headache problem. Let’s not to say some 10-bit HEVC videos shot in DLOG-M. If you are still unable to import HEVC-encoded files into Adobe Premiere Pro CC after installing the HEVC codec or upgrading, transcoding HEVC files becomes a highly recommended method, especially if your files are in 4K HEVC and you don’t have a high-end computer.
To convert Mavic Pro 2 H.265 HEVC files for Premiere Pro 2018, you can adopt HD Video Converter for help. This program features high efficiency and seamless conversion. With it, you can transcode HEVC/H.265 MP4, HEVC MOV, 4K HEVC/H.265 to lossless MPEG-2, ProRes codec, which can be used in Premiere Pro CC, CS6, CS5 without any trouble.
Download and install the top H.265/HEVC converter, then follow the steps below.
Here’s what you need
HD Video Converter


Step 1: Start up HD Video Converter as an HEVC H.265 to Premiere Pro Converter.
Step 2: Click ‘Add File’ to import your source media to the program.

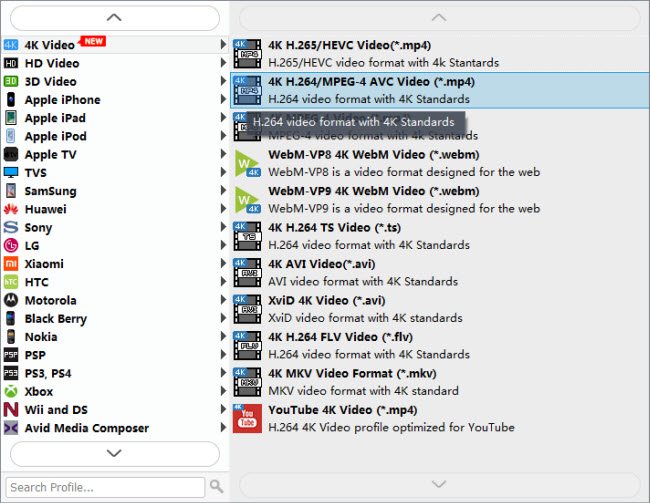
Step 3: Select output format
* If you are on a Windows PC, from the “Profile” bar, choose ‘Avid DNxHD 1080p (*.mov)’ as output under ‘Avid Media Composer’ column. (See the screenshot above)
** If you are on a Mac computer, choose ‘Apple ProRes 422 (*.mov)’ as target under ‘Final Cut Pro’ catalogue.

*** Note that this converter program can only output Apple ProRes and DNxHD video up to 1080p, if you want to preserve 4K quality of your source files, you need to select “4K Video” > “4K H.264/MPEG-4 AVC Video (*.mp4)” as target format. To export 4K files, please make sure your computer has enough power to process 4K. If not, simply select Apple ProRes or DNxHD as output format depending on your OS.
Step 4: Custom video and audio settings (for advanced users)
Click ‘Settings’ button, the ‘Profile Settings’ panel pops up, on which you are able to modify video and audio settings like resolution, bit rate, frame rate, sample rate and audio channel.
Step 5: When ready, click ‘Convert’ to start transcoding HEVC H.265 files to Premiere Pro supported format. As soon as the conversion is complete, click ‘Open Folder’ button to locate the generated files and now you are able to open them in Premiere Pro for further editing smoothly.
Also read
iPhone HEVC is all black in FCP X, how to fix?
AVCHD MTS no audio in iMovie on High Sierra
How to convert Hero 6 240 fps H.265 video to ProRes?
MTS in iMovie 10.1.8-High Sierra won’t import AVCHD
How to install ProRes codec for Windows Premiere?