If you are facing issues working with JVC 4K MOV files in Sony Vegas Pro 13, you may wish to read this post. It explains a workaround to transcode JVC 4K MOV files for editing in Vegas Pro 13 smoothly.
Vegas Pro 13 won’t import 4K MOV files from JVC camera
“Hi, there, I’m using Sony Vegas Pro 13 to edit 4K MOV files copied from a JVC camera. My client delivered these files to me via an external hard drive. Unfortunately, Vegas Pro 13 will not directly import these JVC 4K .MOV files. When I do a file open, MOV files are not displayed as valid input files. I don’t frequently deal with .MOV files. Can anyone advise a solution? Thanks!”
If for whatever reason you are unable to work with JVC 4K MOV files in Vegas 13, we would recommend transcoding them to a format that is best suitable for use in Vegas 13 first. This requires third party software like HD Video Converter. Read on to learn a quick guide on how to encode JVC 4K MOV files for editing in Vegas Pro 13.
Here’s what you need
HD Video Converter


How to transcode JVC 4K MOV files to MPEG-2 for editing in Sony Vegas Pro 13 with optimal quality?
The steps:
Step 1: Start up HD Video Converter as a professional JVC 4K MOV files to Sony Vegas Converter. Click ‘Add File’ to import your source media to the program.
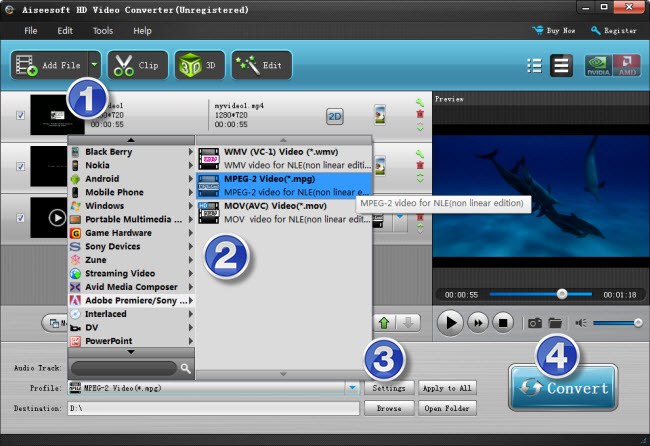
Step 2: Select output format
Click the drop-down list besides ‘Profile’, choose ‘Adobe Premiere/Sony Vegas > MPEG-2 Video (*.mov)’ as the most compatible format for Vegas 13 with best quality.
Important: If you’ve loaded a number of video clips to do batch conversion, please do remember ticking off ‘Apply to All’ option before you start.
Step 3: Custom video and audio settings (for advanced users)
If necessary, you can click ‘Settings’ button and go to ‘Profiles Settings’ panel to modify video and audio settings like video encoder, resolution, video bit rate, frame rate, aspect ratio, audio encoder, sample rate, audio bit rate, and audio channels. 3D settings are also available.
Step 4: When ready, click ‘Convert’ to start transcoding JVC 4K MOV files to Sony Vegas Pro 13 supported MPEG-2 format. As soon as the conversion is complete, click ‘Open File’ button to locate the generated files and now you are able to open them in Vegas 13 easily for further editing.
Related posts
Edit JVC GW-SP100 4K H.264/AVCHD in Premiere
JVC GY-HM650U workflow on Mac iMovie and FCP X
How to convert .mov files for editing in Sony Movie Studio?
Import/edit Panasonic HC-VX870K 4K MP4 in Pinnacle Studio
JVC GY-HM650U workflow in Avid, Premiere and Sony Vegas