If you are having issues importing Sony HXR-NX5U AVCHD footage to Apple iMovie for further editing, you can read this post to find out tips and tricks for editing Sony NX5U AVCHD MTS media in iMovie fast and fluidly.

The first in Sony’s line of NXCAM solid-state camcorders, the HXR-NX5U is also the company’s first professional-level AVCHD camcorder. And while it may look similar to its HDV predecessor, the HVR-Z5U, in fact this is a very different animal. Its ability to capture HD and SD video in AVCHD and MPEG-2 formats–and save it to solid state media–is only one of its distinctive traits. Full-raster 1920 x 1080 video is another, including the option of recording 720/60p video as well as 60i, 30p and 24p. And because the NX5U can capture to media cards plus an optional flash memory unit, you can simultaneously record a different signal to each, whether HD + a backup or HD + SD. The footage is then easily downloaded to a computer or backup drive using USB 2.0.
For a quick and smooth Sony NX5U and iMovie workflow, videographers sometimes will process “transcoded editing”. That means you convert Sony NX5U footage to an intermediate format that is well supported by iMovie before bringing them into your editing program, such as Apple’s Intermediate Codec (AIC) encoded QuickTime MOV format, iMovie’s favorite editing codec, which iMovie will recognize and handle well. Read on to find a step-by-step guide talking about how to transcode Sony NX5U AVCHD footage to AIC .MOV for iMovie editing with lossless quality.
[Guide] How to encode Sony NX5U AVCHD files to AIC for iMovie editing?
Software requirement
HD Video Converter for Mac

Step 1: Open up HD Video Converter for Mac as a Sony NX5U AVCHD Converter for iMovie. When its main interface comes up, click ‘Add File’ to load your source media.

Step 2: Select output format for your editing program
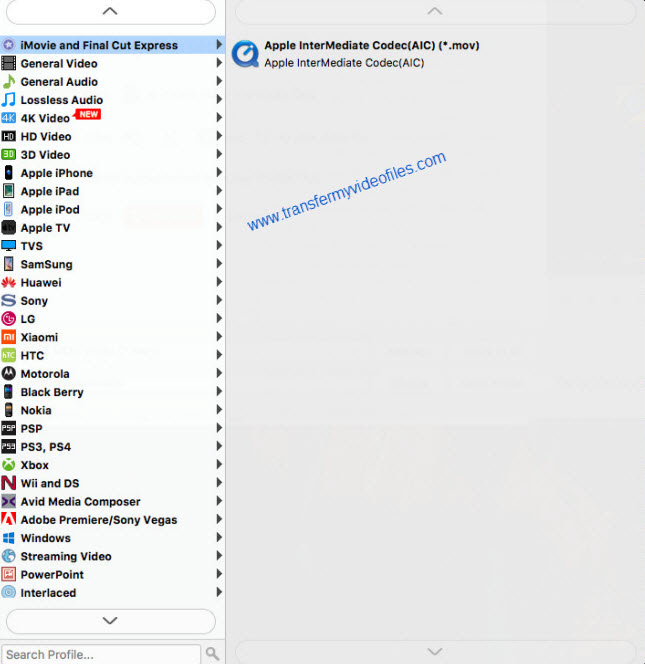
To convert Sony NX5U AVCHD for iMovie, from ‘Profile’ list, choose ‘Apple InterMediate Codec (AIC)(*.mov)’ as output format under ‘iMovie and Final Cut Express’ column.

Important: If you’ve loaded a number of video clips to do batch conversion, please do remember ticking off ‘Apply to All’ option before you start.
Step 3: Custom video and audio settings (optional)
If necessary, you can click ‘Settings’ button and go to ‘Profiles Settings’ panel to modify video and audio settings like video encoder, resolution, video bit rate, frame rate, aspect ratio, audio encoder, sample rate, audio bit rate, and audio channels. 3D settings are also available.
Step 4: Begin Sony NX5U AVCHD MTS clips to MOV Conversion on Mac
When ready, click ‘Convert’ to start format conversion. Once the conversion process is complete, you can click ‘Open Folder’ button to get the generated AIC MOV files for editing in iMovie with optimum performance.
Tips:
If you don’t want to wait for the entire conversion process, you can tick off ‘Showdown computer when conversion completed’ and go away to do other things.
Related posts
Import and edit Sony HXR-NX5U AVCHD/MTS in FCP
Panasonic HVX200 P2 MXF and iMovie’8/9/11 workflow
Import Sony RX100 III 60p XAVC S/AVCHD files to iMovie
How to transcode Canon C500 MXF footage to AIC for iMovie?
60p video in iMovie – does iMovie’11 properly handle 60fps video now?
