Summary: This post is mainly talking about how to convert Panasonic AG-HPX300/370 P2 MXF footage to an intermediate editing format that is best suited for use in Avid, Adobe Premiere and Sony Vegas.
How can I batch transfer AG-HPX300/370 P2 MXF to MOV without losing quality and sound?
“Hey, all, I’m attempting to batch transfer HD footage from a Panasonic AG-HPX370 (P2 MXF) to .mov with DNxHD codec. In fact, I already have had a converter installed. It is able to convert the P2 video files, but it looks jagged, and the audio isn’t being included. I want the footage to stay original quality without losing sound. Is there a way to do this? Can not find a converter to do what I want. Any suggestion would be greatly appreciated!! Thanks.”
If Googling, you will find there are lots of MXF converters out there coming from shady companies who blast you with spam, possibly malware, and so forth. Therefore, it’s very important to pick up a workable and reliable converter that is capable of handling P2 MXF footage as you want. As for converting hundreds of P2 MXF files captured with a Panasonic AG-HPX300/370 or something similar for editing in Avid, Adobe Premiere or Sony Vegas, you can try out HD Video Converter. It can read MXF files from a complete P2 folder structure and convert them to DNxHD MOV, ProRes MOV, etc. maintaining original quality without losing audio track, and everything will work swimmingly.
You can download a demo version (for both, PC and Mac) to have a try. They are not free but it is totally worth it.


Read before try
While importing MXF clips to HD Video Converter for conversion, please make sure you have the entire MXF file structure as it saved on your camcorder’s P2 card. If you only have some loose .MXF clips, your files will have image only without audio. See MXF file structure on Panasonic’s P2 card as below.
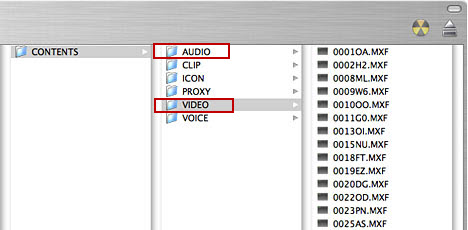
MXF file structure on Panasonic’s P2 card
The above screenshot clearly shows .MXF clips are all saved in ‘VIDEO’ folder, while audio files are all stored in ‘AUDIO’ folder. When you importing .MXF clips from the correct file structure, the HD Video Converter is able to recognize audio tracks from ‘AUDIO’ folder automatically, which ensures the generated ProRes 422 MOV files have both image and sound correctly.
How to transcode Panasonic AG-HPX300/370 P2 MXF files for working with Avid, Premiere and Vegas?
Follow these steps:
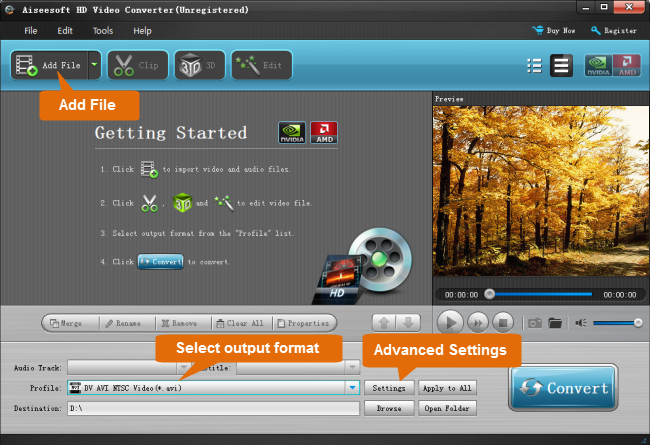
Step 1: Start up HD Video Converter as a professional Panasonic AG-HPX300/370 P2 MXF Converter. When its main interface pops up, click ‘Add File’ to input your source media.
Step 2: Select output format for your NLEs
1) Convert AG-HPX300/370 P2 MXF to DNxHD for Avid MC
From ‘Format’ bar, select ‘Avid DNxHD (*.mov)’ as output format under ‘Avid Media Composer’ column.
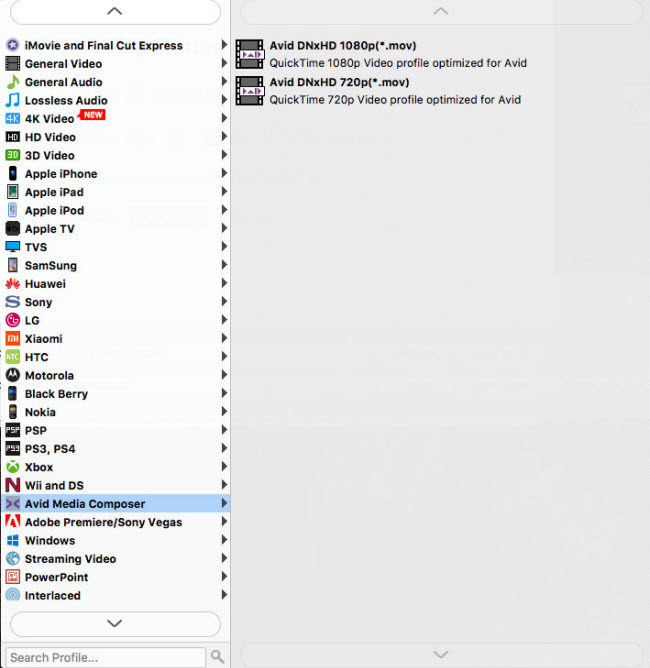
Important: If you’ve loaded a number of video clips to do batch conversion, please do remember ticking off ‘Apply to All’ option before you start.
2) Convert AG-HPX300/370 P2 MXF files for Premiere
If you are running Premiere Pro on a Windows PC, you can from ‘Format’ bar, select ‘Avid DNxHD (*.mov)’ as output format under ‘Avid Media Composer’ column.
If you are using Premiere Pro on a Mac, you can select ‘Apple ProRes 422 (*.mov)’ as output format under ‘Final Cut Pro’ column.

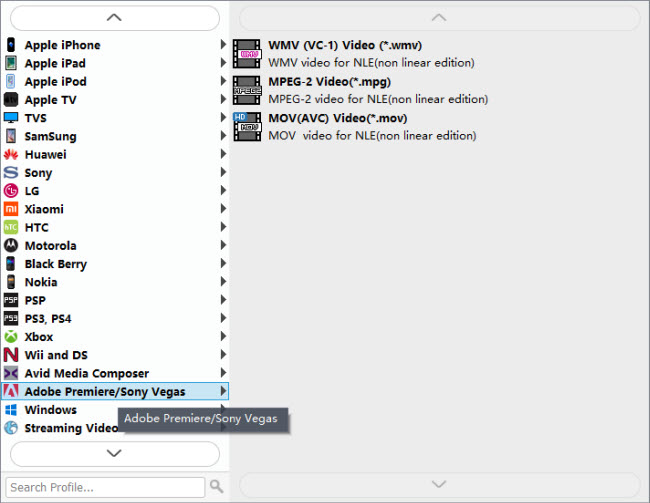
In addition to DNxHD and ProRes, you can also select ‘MOV (AVC) (*.mov)’ as output format under ‘Adobe Premiere/Sony Vegas’ option.
3) Transcode AG-HPX300/370 P2 MXF video for Sony Vegas
Click the drop-down list besides ‘Profile’, choose ‘Adobe Premiere/Sony Vegas > MOV (AVC) (*.mov)’ as the most compatible format for Vegas with best quality. You can choose ‘MPEG-2 (*.mpg)’, or ‘WMV (VC-1) (*.wmv)’ as well.
This method is also available when you want to edit AG-HPX300/370 P2 MXF files in Adobe Premiere Pro and After Effects.
Step 3: Custom video and audio settings
If necessary, you can click ‘Settings’ button and go to ‘Profiles Settings’ panel to modify video and audio settings like video encoder, resolution, video bit rate, frame rate, aspect ratio, audio encoder, sample rate, audio bit rate, and audio channels. 3D settings are also available.
Step 4: Start AG-HPX300/370 P2 MXF media to MOV Conversion
When ready, click ‘Convert’ to start format conversion. As soon as the conversion is complete, you can click ‘Open Folder’ button to get the exported MOV files for use in Avid apps, Adobe Premiere or Sony Vegas with optimum performance. Nothing could be simpler or more immediate.
Tips:
MXF files are always HD content, so the conversion process may costs a little longer time. In this situation, you can tick off ‘Showdown computer when conversion completed’ and go away to do other things.
Related posts
Why Adobe Premiere Pro CS6 can’t import MXF video files?
How can I import MXF footage into Avid Media Composer?
FCP 7 not recognizing my MXF file – convert MXF to ProRes
Convert P2 MXF to ProRes for FCP 6/7/X without losing sound
MXF and Vegas – How can I edit MXF video files in Sony Vegas?