Davinci Resolve is a popular video editing software that’s widely used by creators to achieve professional editing goals. With its user-friendly interface, almost everyone can make their videos look professional, even if they’re new to the editing world.
However, like any other editing software, Davinci Resolve often runs into several glitches. One of these glitches that have been encountered by many users is the problem of Davinci Resolve no audio.
If you’ve ever encountered the no audio problem in Davinci Resolve, we’re here to help. In this porst, we’re going to explain different effective tactics that’ll help you fix it.
Part 1: 3 Solutions to No Audio In Davinci Resolve
Davinci Resolve no audio issue can arise due to several reasons. That’s why there are different troubleshooting methods to fix it. Let’s discuss each of these methods individually.
Solution 1: Change Audio Control Panel
There are several cases when Davinci Resolve has nothing to do with the no audio issue, but the system’s default audio settings are the actual cause for the error. In this case, you can try tweaking the audio settings by accessing the audio control panel.
Follow these instructions to access the audio control panel and change its default settings to fix the no audio error.
Step 1: First of all, close all the applications, including Davinci Resolve, that might be using the system’s audio.
Step 2: Go to the Windows control panel, choose System and click sound tab at right. Or right click the audio icon in the taskbar and click sound to launch the audio control panel.
![Importing mp4 to davinci resolve but no sound [Solved]](https://www.transfermyvideofiles.com/img/post/1windows-settings-system.JPG)
Step 3: Locate the audio output device you’re currently using (such as internal speakers or headphones).
Step 4: Click Device properties and move to the Advanced tab.
![Importing mp4 to davinci resolve but no sound [Solved]](https://www.transfermyvideofiles.com/img/post/2device-property.JPG)
Step 5: By default, the format box will be set to 16bit, 44100Hz (CD Quality). To fix the no audio issue in Resolve, you’ll have to change it to 24bit, 48000 Hz (Studio Quality).
![Importing mp4 to davinci resolve but no sound [Solved]](https://www.transfermyvideofiles.com/img/post/3change-property.JPG)
Step 6: Click “OK followed by “OK” and launch Davinci Resolve again. Import a video file to check if the problem persists or not.
Solution 2: Use System Setting
If the above method doesn’t work for you, you may have to make further changes to audio preferences in Davinci Resolve itself. The most effective solution is to select “use system settings” in the video and audio I/O preferences. However, you may have to make some additional changes to fix the error completely.
So, after changing the default format box from the audio control panel, follow these instructions to fix Davinci Resolve no sound problem.
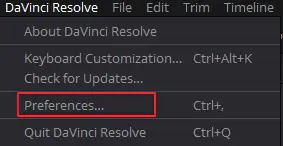
Step 1: Launch Davinci Resolve and go to Preferences.
Step 2: Select video and audio I/O and tap on speaker configuration: manual.
![Importing mp4 to davinci resolve but no sound [Solved]](https://www.transfermyvideofiles.com/img/post/5speaker-configuration-manual.jpg)
Step 3: Now, choose the audio output device you’re currently using. Here you’ll find that the left and right audio channels are unassigned. All you have to do is assign these channels and tap “Save”.
Step 4: Now, go back to video and audio I/O preferences and select “Use System settings”. That’s it; the audio will work fine, and you won’t face the ‘no audio’ issue anymore.
Solution 3: Restore Default Settings
![Importing mp4 to davinci resolve but no sound [Solved]](https://www.transfermyvideofiles.com/img/post/6restore-defaults.JPG)
In case you’re still encountering the Davinci Resolve no audio error, we recommend rolling back to the system’s audio settings to default and changing Resolve’s video & audio preferences to “Use System Settings”. This will allow your system to go back to the default settings, which (in the majority of the cases) will get the job done.
Here’s how you can change audio settings to default.
Step 1: First of all, make sure that video and audio preferences in Davinci Resolve are set to Use System settings.
Step 2: Now, tap the audio icon in the taskbar or go to the Windows control panel to launch the Audio Settings.
Step 3: Choose the device you’re using for audio output and select Device properties.
Step 4 Switch to the Advanced tab and tap Restore Defaults. Click on OK and then OK again.
Step 5: This will set your system’s Audio settings to default. Now, restart the computer to apply the changes.
Step 6: Open Davinci Resolve and check if it’s able to play audio or not.
Davinci Resolve no audio error isn’t an uncommon sight for editors. Many Davinci users have encountered this issue at least once in their lifetime. Fortunately, fixing the error is not a complicated task. By making small changes to the system audio settings, you can easily fix the error without any hassle. So, follow the instructions mentioned above to fix no audio issue and get back to editing professional-looking videos.
Part 2: Convert Video for Solving Davinci Resolve No Audio Issue
It’s also worth noting that Davinci Resolve supports selected audio formats only. It means that if you try to play any other audio format other than the supported codecs, you’re most likely to encounter the no audio error.
How to create DaVinci Resolve edit friendly files?
Software requirement
HD Video Converter


The steps:
Step 1: Start up HD Video Converter as a Video Converter for DaVinci Resolve. When its main interface pops up, click ‘Add File’ to input your source media.

Step 2: Choose output format for DaVinci Resolve
To convert video files to DNxHD for DaVinci Resolve, you can from ‘Profile’ bar, select ‘Avid DNxHD (*.mov)’ as output format under ‘Avid Media Composer’ column.
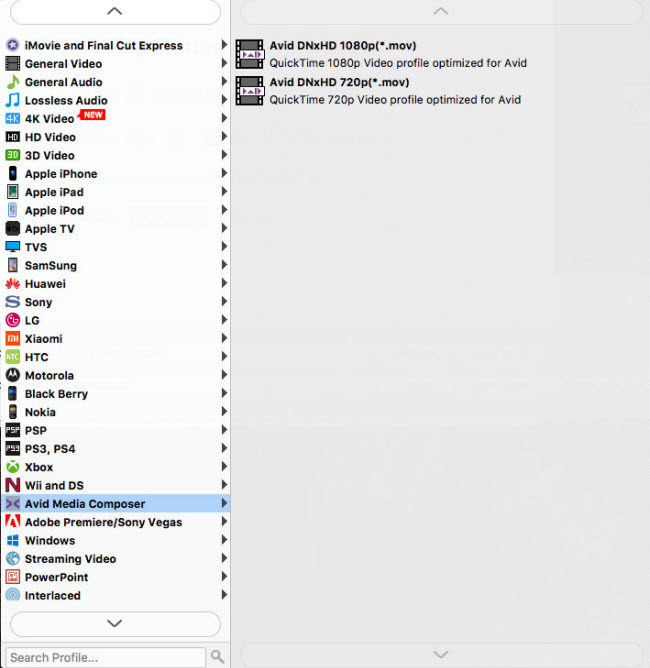
To encode video files to ProRes 422 for DaVinci Resolve, you can choose ‘Final Cut Pro’ > ‘Apple ProRes 422 (*.mov)’ as target format.

Important: If you’ve loaded a number of video clips to do batch conversion, please do remember ticking off ‘Apply to All’ option before you start.
Step 3: Custom video and audio settings
If necessary, you can click ‘Settings’ button and go to ‘Profiles Settings’ panel to modify video and audio settings like video encoder, resolution, video bit rate, frame rate, aspect ratio, audio encoder, sample rate, audio bit rate, and audio channels. 3D settings are also available.
Step 4: Start video files to DNxHD/ProRes MOV Conversion
When ready, click ‘Convert’ to start format conversion. As soon as the conversion is complete, you can click ‘Open Folder’ button to get the exported MOV files for use in DaVinci Resolve with optimum performance. You won’t encounter audio lost issues any more.
Related posts
Sony PXW-Z100 4K XAVC video to FCP and DaVinci Resolve
DaVinci Resolve workflow with Panasonic AG-HPX250 P2 MXF
How to import and edit AVCHD footage within DaVinci Resolve?
DaVinci Resolve workflow with Sony F55/F5 XAVC MXF footage
How to import Sony HDR-AS15 MP4 footage to DaVinci Resolve?